Introduction
Earthquake Cake is a delightful dessert that combines rich chocolate flavors with a surprise layer of cream cheese and nuts. Its name originates from the 'quaking' appearance it takes on as it bakes, resulting in a visually stunning centerpiece for any gathering.
This cake is wonderfully versatile, making it ideal for birthdays, potlucks, or a cozy family dinner. With its combination of flavors and textures, Earthquake Cake is sure to impress your guests and become a favorite in your dessert repertoire.
Ingredients
- 1 cup all-purpose flour
Flour provides structure to the cake, allowing it to rise and achieve that perfect fluffy texture. It also serves as the base for the dry ingredients. - 1 cup granulated sugar
Sugar not only sweetens the cake but also helps in creating a tender crumb by inhibiting gluten formation during mixing. - 1/2 cup unsweetened cocoa powder
This ingredient infuses rich chocolate flavor and color into the cake. It balances the sweetness and contributes to the cake's deep, dark hue. - 1 cup shredded coconut
Coconut adds texture and a subtle sweetness, complementing the chocolate. Additionally, it provides a tropical twist that makes the cake unique. - 1/2 cup chopped nuts (walnuts or pecans)
Nuts add crunch and richness, enhancing the overall flavor profile. They also contribute healthy fats and protein, making the cake more satisfying. - 1/2 cup cream cheese, softened
Cream cheese creates a creamy, luscious layer that contrasts beautifully with the cake. It adds richness and a slight tanginess that balances the sweetness. - 3 large eggs
Eggs act as binders, providing moisture and structure. They also help achieve a desirable texture, giving the cake its light and airy quality. - 1/2 cup vegetable oil
Oil ensures that the cake remains moist and tender. Unlike butter, it does not solidify when cooled, meaning the cake retains its inviting texture. - 1 cup water
Water hydrates the dry ingredients and ensures even mixing, which is particularly important for a uniform cake batter. - 1 teaspoon baking powder
Baking powder is a leavening agent that creates lift in the cake. It reacts with liquid to produce carbon dioxide, contributing to the cake's fluffiness. - 1 teaspoon vanilla extract
Vanilla extract enhances the overall flavor profile, adding a warm depth that beautifully complements the chocolate and coconut.
Directions & Preparation
Step 1: Preheat your oven to 350°F (175°C).
Properly preheating your oven is essential for even baking and ensuring that cakes rise correctly from the start. Use an oven thermometer to check accuracy since an oven that's too hot or too cool can ruin the final result.
Step 2: Grease and flour a 9×13 inch baking pan.
Greasing the pan prevents the cake from sticking, which is crucial for achieving a clean release. Adding flour after greasing forms a protective coating that provides extra assurance.
Step 3: In a large bowl, mix together the flour, sugar, cocoa powder, baking powder, and water until well combined.
Mixing dry ingredients together ensures even distribution of leavening agents and flavorings before adding wet ingredients. It's important to combine them thoroughly to avoid any lumps.
Step 4: Add vegetable oil, eggs, and vanilla extract to the bowl, and mix until smooth.
Incorporating the wet ingredients helps ensure that the batter is cohesive and well-blended. Mixing until smooth eliminates any lumps and creates a silky texture that will bake evenly.
Step 5: Fold in the shredded coconut and chopped nuts.
Folding these ingredients into the batter gently helps maintain the cake's lightness while distributing the coconut and nuts evenly throughout the mixture for added flavor and texture.
Step 6: Pour half of the batter into the prepared pan and spread it evenly.
Pouring half of the batter first allows for an even distribution and gives space for the cream cheese layer, which is crucial for that characteristic 'earthquake' effect during baking.
Step 7: In a separate bowl, beat the softened cream cheese until smooth and spread it over the batter.
Beating the cream cheese removes lumps, ensuring a smooth layer that will create a nice contrast in texture with the cake. Spread it gently to avoid disrupting the batter underneath.
Step 8: Top with the remaining batter and smooth the surface.
Covering the cream cheese layer with the remaining batter ensures it stays hidden during baking, allowing the unique 'earthquake' effect to develop naturally as the cake rises.
Step 9: Bake in the preheated oven for 30-35 minutes.
Baking at the right temperature for the correct duration is key to achieving a moist cake with a well-cooked interior. You'll know it's done when a toothpick inserted into the center comes out clean or with a few moist crumbs.
Step 10: Let the cake cool in the pan for 10 minutes, then transfer to a wire rack.
Cooling the cake in the pan helps set its structure, reducing the risk of it falling apart during transfer. A wire rack allows for air circulation, preventing the bottom from becoming soggy.
Step 11: Serve warm or at room temperature, optionally topping with whipped cream or chocolate drizzle.
Serving the cake warm enhances its flavors and allows the cream cheese layer to be creamy and luscious. Toppings like whipped cream or chocolate drizzle add an extra touch of indulgence.

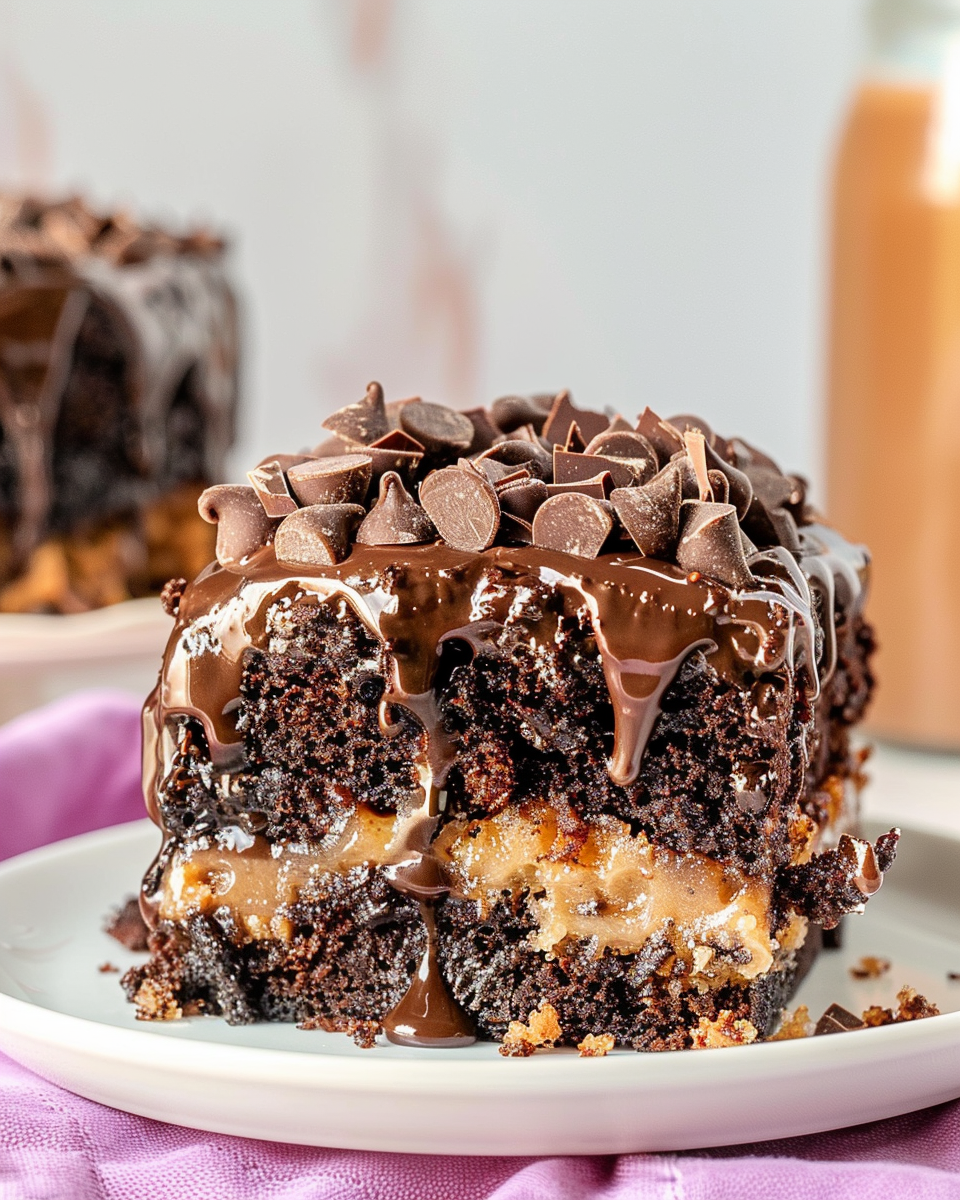
The Unique Texture of Earthquake Cake
One of the most fascinating aspects of Earthquake Cake is its unique texture. The distinct layers created by the cake batter and the cream cheese mixture bake together, causing the cake to rise unevenly, resulting in its signature 'earthquake' appearance. This visual contrast is not only appealing but also tantalizes the taste buds with varying levels of softness and creaminess in each bite.
Personalize Your Earthquake Cake
While the classic Earthquake Cake features coconut and nuts, this dessert is highly adaptable. Consider swapping in your favorite mix-ins such as chocolate chips, dried fruits, or even crushed pretzels for an added salty note. This versatility ensures that you can create a customized version that fits your taste buds, making each baking session a new adventure.
The Perfect Occasion for Earthquake Cake
Earthquake Cake is the ideal dessert for various occasions. Whether it's a birthday celebration, holiday gathering, or a potluck with friends, this cake steals the show. Its striking appearance makes it a conversation starter, and its rich flavor profile satisfies guests of all ages. It’s the kind of cake that lingers in your memory long after the last slice has been served.
FAQs
What if my batter is too thick?
If your batter appears too thick, you can add a tablespoon of water or milk at a time until it reaches a pourable consistency. Make sure not to add too much liquid at once to maintain the balance of flavors and texture.
Can I substitute the coconut with another ingredient?
Absolutely! If you're not a fan of coconut, consider using crushed cookies like Oreos or graham crackers for a different texture and flavor. Just be mindful of how this might affect the sweetness.
How can I avoid a dry cake?
To prevent your cake from turning out dry, be careful not to overbake it. Start checking for doneness a few minutes before the recommended baking time. Keep an eye on the edges; they should be set while the center remains slightly soft.
Why did my cream cheese layer sink?
If the cream cheese layer sinks to the bottom, it may be due to the batter being too thick or not being spread evenly. Make sure to use a smooth cream cheese mixture and gently fold it into the batter.
Can I make this cake in advance?
While this cake is best enjoyed fresh, you can bake it a day ahead. Just be sure to cool it completely and wrap it well to keep it moist until you're ready to serve.
What can I do if my cake is too sweet?
If the cake is overly sweet for your taste, a light sprinkle of sea salt on top or pairing it with an unsweetened whipped cream can help balance out the flavors.
How do I ensure even mixing of ingredients?
To achieve even mixing, always sift dry ingredients together before combining them with the wet ingredients and mix until just combined to avoid overworking the batter.
Can I add other flavors to the cake?
Certainly! You can enhance the flavor by adding extracts like almond or coconut extract or using different frostings to top the cake when serving.
Conclusion
Baking Earthquake Cake is not only about creating a delicious dessert; it's also about the joy of sharing something special with loved ones. Its unique texture and layers make it a fun cake to bake and serve.
Whether you stick to the classic ingredients or customize it to your liking, this cake promises to delight with every bite. So gather your friends or family, and make this delightful dessert your next kitchen adventure.
Recipe Card

Decadent Earthquake Cake for Your Next Gathering
Ingredients
- 1 cup all-purpose flour
- 1 cup granulated sugar
- 1/2 cup unsweetened cocoa powder
- 1 cup shredded coconut
- 1/2 cup chopped nuts walnuts or pecans
- 1/2 cup cream cheese softened
- 3 large eggs
- 1/2 cup vegetable oil
- 1 cup water
- 1 teaspoon baking powder
- 1 teaspoon vanilla extract
Instructions
- Preheat your oven to 350°F (175°C).
- Grease and flour a 9x13 inch baking pan.
- In a large bowl, mix together the flour, sugar, cocoa powder, baking powder, and water until well combined.
- Add vegetable oil, eggs, and vanilla extract to the bowl, and mix until smooth.
- Fold in the shredded coconut and chopped nuts.
- Pour half of the batter into the prepared pan and spread it evenly.
- In a separate bowl, beat the softened cream cheese until smooth and spread it over the batter.
- Top with the remaining batter and smooth the surface.
- Bake in the preheated oven for 30-35 minutes.
- Let the cake cool in the pan for 10 minutes, then transfer to a wire rack.
- Serve warm or at room temperature, optionally topping with whipped cream or chocolate drizzle.
Notes
Additional serving suggestions: pair with a crisp salad, garlic bread, or roasted seasonal vegetables for balance.
For make-ahead, prep components separately and assemble just before heating to preserve texture.
Taste and adjust with acid (lemon/vinegar) and salt right at the end to wake up flavors.


