Introduction
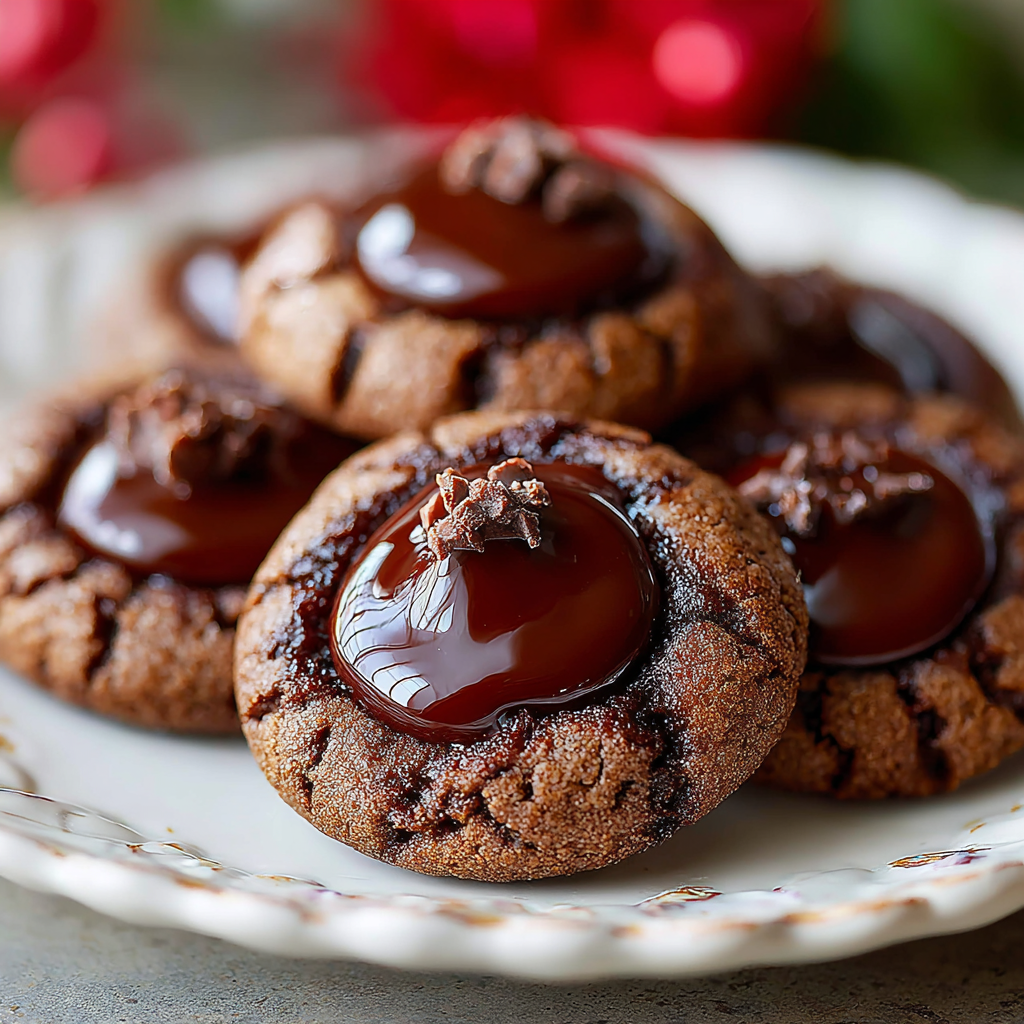
Chocolate thumbprint cookies are a delightful twist on a classic treat, combining a tender, chocolatey exterior with a sweet surprise nestled in the center. These cookies are perfect for all occasions, whether it's a cozy family gathering or a festive holiday party.
The rich cocoa flavor, paired with a smooth chocolate filling, creates an indulgent experience that chocolate lovers will cherish. The thumbprint technique not only offers a unique look but also allows for customization with various fillings, ensuring that each batch can be made perfectly personal.
Ingredients
- 1 cup unsalted butter, softened
Butter provides the essential fat that gives the cookies their rich flavor and tender texture. Softened butter also helps to incorporate air when creamed, leading to a lighter cookie. - 1 cup granulated sugar
Granulated sugar not only sweetens the cookies but also contributes to their structure by creating a balance between moisture and crispness. The right amount of sugar is crucial for the perfect chew. - 1 cup packed brown sugar
Brown sugar adds moisture and a slight chewiness thanks to its higher molasses content. This depth of flavor enriches the chocolate taste and enhances the overall texture of the cookie. - 2 large eggs
Eggs act as a binding agent, providing stability to the dough. They also contribute moisture and richness, resulting in a soft and delicious cookie. - 2 teaspoons vanilla extract
Vanilla extract is vital for enhancing the overall flavor profile of the cookies. It adds warmth and complexity, rounding out the chocolate taste beautifully. - 2 cups all-purpose flour
Flour is the backbone of the cookie dough, providing structure. The right type of flour ensures that the cookies hold their shape without becoming too dense. - 1/2 cup unsweetened cocoa powder
Cocoa powder gives these cookies their vibrant chocolate color and taste. It also helps to deepen and enrich the chocolate flavor base of the cookie. - 1 teaspoon baking powder
Baking powder is a leavening agent that helps the cookies rise and become fluffy. It activates when moistened and heated, making it essential for the desired texture. - 1/2 teaspoon salt
A pinch of salt enhances the sweetness and balances the flavors. It helps to bring out the complexity of the chocolate and creates a more rounded taste. - 1 cup chocolate ganache or filling of choice
The thumbprint is filled with chocolate ganache or another sweet filling, providing a luscious contrast to the cookie's texture. This surprise element makes each bite uniquely delightful.
Directions & Preparation
Step 1: Preheat the oven to 350°F (175°C).
Preheating your oven is a crucial step that ensures even baking. When you place the cookies in a properly heated oven, they will cook evenly across, achieving the ideal texture without being overcooked on the outside.
Step 2: In a large bowl, cream together the softened butter, granulated sugar, and brown sugar until light and fluffy.
Creaming the butter and sugars incorporates air into the mixture, which helps the cookies rise and gives them a light texture. Beat the mixture for several minutes until it turns pale and fluffy, ensuring you achieve the right consistency.
Step 3: Add the eggs, one at a time, and mix well after each addition, then stir in the vanilla extract.
Incorporating the eggs one by one allows for better emulsification, preventing the mixture from separating. This step also enhances the dough's moisture content, ensuring that the cookies remain soft and tender after baking.
Step 4: In a separate bowl, combine the flour, cocoa powder, baking powder, and salt.
Mixing the dry ingredients separately allows for even distribution of cocoa and leavening agents throughout the flour. This step is essential for preventing any clumps and ensures a uniform texture in the final cookies.
Step 5: Gradually add the dry ingredients to the wet mixture, mixing until just combined.
It's important not to overmix at this stage, as excess mixing can lead to tough cookies. Mix until the flour is just incorporated to maintain the desired softness and chewiness.
Step 6: Chill the dough for at least 30 minutes in the refrigerator.
Chilling the dough helps firm it up, making it easier to handle and shape. This step also prevents the cookies from spreading too much during baking, leading to perfectly shaped thumbprints.
Step 7: Roll the dough into 1-inch balls and place them on a baking sheet lined with parchment paper.
Forming uniform balls ensures even baking and a consistent size for all cookies. Placing the dough on parchment paper also prevents sticking and helps with easy removal after baking.
Step 8: Use your thumb (or the back of a spoon) to make an indentation in the center of each ball.
Creating a thumbprint is not just about aesthetics; it allows the filling to hold and adds a delightful texture contrast. Make sure the indentation is deep enough to hold the filling but not so deep that it reaches the bottom.
Step 9: Fill the indentation with chocolate ganache or your choice of filling.
This step adds an explosion of flavor and moisture to the cookie, enhancing the overall experience. Be careful not to overfill, as the filling may bubble over during baking, creating a mess.
Step 10: Bake in the preheated oven for 12-15 minutes, or until the cookies are set but still soft.
Baking is when the magic happens! Ensure to keep an eye on the cookies towards the end of the baking time. They should appear set at the edges but still soft at the center, as they will continue cooking slightly on the baking sheet after removal.
Step 11: Allow cookies to cool completely on the baking sheet before transferring to a wire rack.
Cooling the cookies on the baking sheet helps them set properly and reduces the risk of breaking. Once cooled, transferring them to a wire rack allows for even air circulation, preserving their softness.

The Art of the Perfect Thumbprint
Getting the ideal thumbprint indentation is key to achieving that perfect cookie! The thumb should press firmly but gently; too light won’t create a hold for the filling, while too hard can cause the cookie to crack. It's all about finding that balance so that the cookies maintain their shape while securely holding a generous amount of chocolate ganache.
Choosing the Right Filling
While chocolate ganache is the classic choice for these thumbprint cookies, you can opt for other delicious fillings like fruit jams, caramel, or nut butters. Each filling offers a unique flavor profile, so don't hesitate to get creative! Matching the filling to the cookie's richness can elevate the overall taste experience, making each bite more exciting.
Tips for Decorating Chocolate Thumbprints
To make your chocolate thumbprint cookies even more appealing, consider drizzling them with a bit of melted white chocolate or sprinkled with sea salt right before they harden. These finishing touches not only enhance the presentation but also add textural contrast and an extra layer of flavor, making your cookies a true standout.
FAQs
Why are my cookies cracking on top?
Cracking often occurs when the dough is too dry or the cookies are overbaked. Ensure your measurements are accurate and adjust the bake time slightly if you notice excessive cracking.
What should I do if my dough is too thick?
If your dough seems too thick and hard to work with, consider adding a teaspoon of milk or melted butter. This can help moisten it slightly without compromising the overall texture.
Can I substitute the cocoa powder?
Yes, if you prefer a lighter flavor, you can substitute part of the cocoa powder with additional flour. However, keep in mind that it might alter the sweetness and richness of the final cookies.
Are the thumbprint cookies too sweet?
Sweetness can vary based on the filling you choose. If you're concerned, you can reduce the granulated sugar slightly in the cookie base while maintaining the brown sugar for moisture.
How do I know when the cookies are done baking?
The cookies should look set at the edges while the centers appear slightly soft and puffed. They will firm up as they cool, so be cautious not to overbake.
Can I add nuts to the cookie dough?
Absolutely! Chopped nuts can be a great addition. Just make sure to fold them into the dough before chilling, enhancing the texture and flavor complexity.
Why are my cookies turning out chewy instead of soft?
Chewy cookies might result from overmixing the dough or baking at too high a temperature. Aim for a golden edge while keeping the centers soft for the best results.
Conclusion
Making chocolate thumbprint cookies is an enjoyable experience that brings warmth and joy to any kitchen. These cookies not only satisfy a sweet tooth but also add a touch of elegance to your dessert table.
Experiment with different fillings and decorations to personalize your cookies further, making them a unique treat for every occasion. Gather your loved ones, and enjoy the process of baking—this is where the best memories are made.
Recipe Card

Deliciously Rich Chocolate Thumbprint Cookies
Ingredients
- 1 cup unsalted butter softened
- 1 cup granulated sugar
- 1 cup packed brown sugar
- 2 large eggs
- 2 teaspoons vanilla extract
- 2 cups all-purpose flour
- 1/2 cup unsweetened cocoa powder
- 1 teaspoon baking powder
- 1/2 teaspoon salt
- 1 cup chocolate ganache or filling of choice
Instructions
- Preheat the oven to 350°F (175°C).
- In a large bowl, cream together the softened butter, granulated sugar, and brown sugar until light and fluffy.
- Add the eggs, one at a time, and mix well after each addition, then stir in the vanilla extract.
- In a separate bowl, combine the flour, cocoa powder, baking powder, and salt.
- Gradually add the dry ingredients to the wet mixture, mixing until just combined.
- Chill the dough for at least 30 minutes in the refrigerator.
- Roll the dough into 1-inch balls and place them on a baking sheet lined with parchment paper.
- Use your thumb (or the back of a spoon) to make an indentation in the center of each ball.
- Fill the indentation with chocolate ganache or your choice of filling.
- Bake in the preheated oven for 12-15 minutes, or until the cookies are set but still soft.
- Allow cookies to cool completely on the baking sheet before transferring to a wire rack.
Notes
Additional serving suggestions: pair with a crisp salad, garlic bread, or roasted seasonal vegetables for balance.
For make-ahead, prep components separately and assemble just before heating to preserve texture.
Taste and adjust with acid (lemon/vinegar) and salt right at the end to wake up flavors.


