Introduction
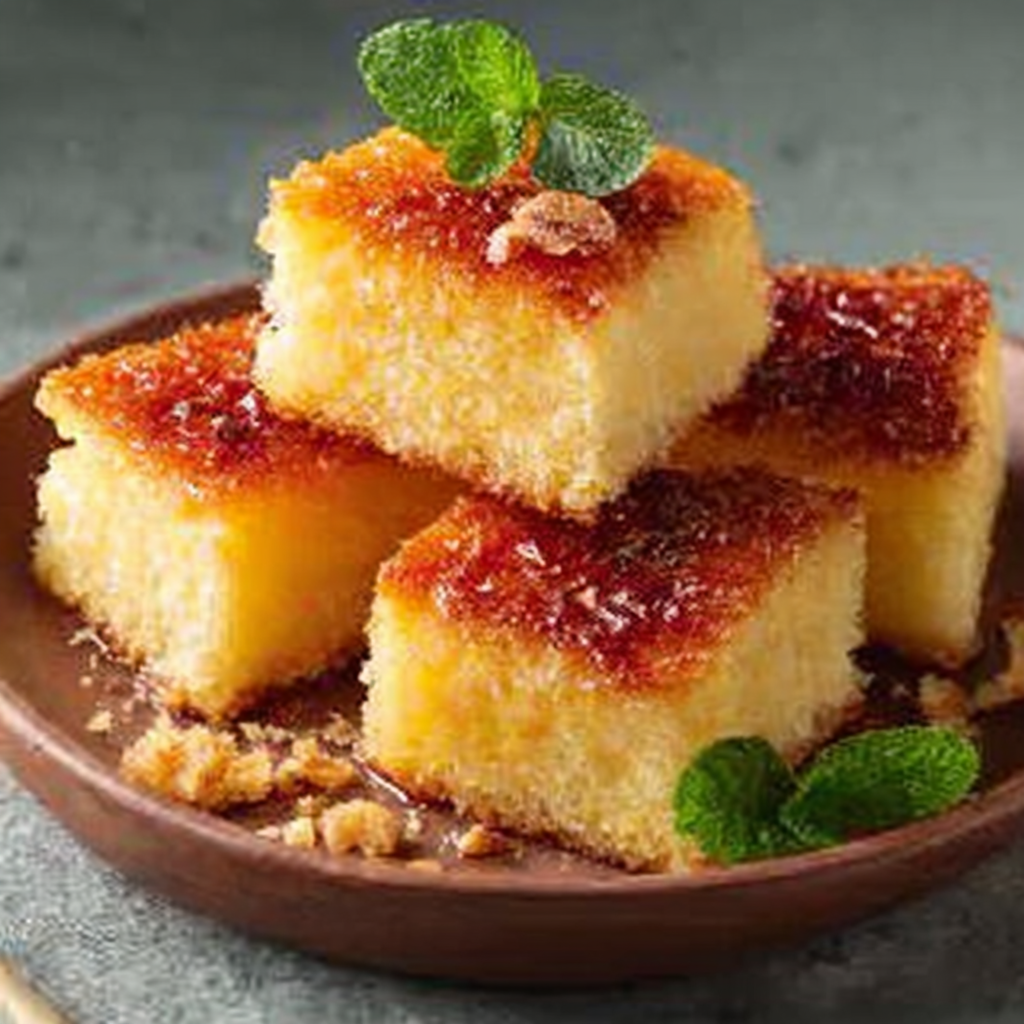
Hawaiian Butter Mochi is a delightful dessert that perfectly captures the spirit of the Islands. Its unique texture, a balance between a cake and chewy mochi, creates a treat that is hard to resist. Traditionally made with glutinous rice flour, this dish is an essential part of Hawaiian culture, often served at gatherings and celebrations.
The rich, buttery flavor combined with the subtle sweetness makes it an inviting dessert for any occasion. Easy to make and wonderfully satisfying, Butter Mochi embodies the essence of home baking, inviting both novice cooks and experienced bakers to try their hand at this beloved treat. Enjoying a slice of this mochi is like taking a bite out of paradise.
Ingredients
- 2 cups glutinous rice flour
This is the primary ingredient that gives mochi its characteristic chewy texture. Glutinous rice flour, also known as sweet rice flour, is crucial for achieving the authentic Hawaiian Butter Mochi experience. - 1 cup granulated sugar
Sugar not only sweetens the dish but also helps create a tender crumb. It works in harmony with the butter to provide a gratifying richness that complements the chewy texture. - 1 teaspoon baking powder
This leavening agent is essential for achieving a light, airy texture. It helps the mochi rise slightly, ensuring that it doesn’t become too dense during baking. - 1 cup coconut milk
Coconut milk infuses the dessert with a creamy richness and tropical flavor. Its natural sweetness enhances the overall taste, creating a more authentic Hawaiian experience. - 1/2 cup unsalted butter, melted
Butter adds richness and moisture to the mochi. Its fat content contributes to a tender texture, ensuring that each bite melts in your mouth. - 4 large eggs
Eggs provide structure and stability to the mochi. They help bind the ingredients together while adding richness and contributing to the overall flavor. - 1 teaspoon vanilla extract
Vanilla adds a lovely depth of flavor to the mochi. Its aromatic qualities complement the other ingredients, enhancing the overall sweetness of the dish.
Directions & Preparation
Step 1: Preheat your oven to 350°F (175°C).
Preheating the oven ensures even baking and prevents any surprises when you place your dish inside. This is an essential step for any baking recipe, as the right temperature allows the butter mochi to develop its characteristic texture.
Step 2: Grease a 9×13 inch baking dish with butter or cooking spray.
Greasing the baking dish is important to prevent the mochi from sticking and makes it easier to cut into squares once baked. Be thorough in your greasing to ensure every part is coated.
Step 3: In a large mixing bowl, whisk together the glutinous rice flour, sugar, and baking powder until well combined.
Mixing these dry ingredients ensures that the sugar and leavening agent are evenly distributed throughout the flour. This is crucial for achieving the right texture and flavor in the final product.
Step 4: In a separate bowl, combine the coconut milk, melted butter, eggs, and vanilla extract. Beat well until the mixture is smooth.
Combining the wet ingredients before adding them to the dry ensures a more homogenous batter. It's key to make sure the butter isn’t too hot to avoid cooking the eggs prematurely.
Step 5: Gradually add the wet mixture to the dry ingredients, stirring until fully incorporated and smooth.
This step is about building a cohesive batter. Be careful not to overmix, as stirring too vigorously can create a denser texture.
Step 6: Pour the batter into the prepared baking dish and spread it evenly.
Spreading the batter evenly helps the mochi bake uniformly, ensuring that it cooks through properly without creating any uneven or undercooked spots.
Step 7: Bake for 45-50 minutes, or until the top is lightly golden and a toothpick inserted comes out clean.
Baking times can vary based on your oven, so keep an eye on the mochi towards the end of the baking time. The golden top is a good indicator that the mochi is ready and will help in developing that coveted chewy texture.
Step 8: Allow the mochi to cool in the pan for at least 30 minutes before cutting into squares.
Cooling is crucial as it allows the mochi to firm up and makes it easier to cut. If you rush this step, the mochi may be too soft and sticky to slice properly.

The History of Butter Mochi in Hawaiian Culture
Hawaiian Butter Mochi is deeply rooted in the Islands' culinary traditions, reflecting the influences of native Hawaiian culture and Asian recipes. As families began to experiment with available ingredients, the dish evolved into a beloved treat often served at luaus and special gatherings. Today, Butter Mochi stands not only as a dessert but as a symbol of hospitality and warmth in Hawaiian cooking.
Texture Tips for Perfect Butter Mochi
Achieving the ideal texture is key to a successful Butter Mochi. The glutinous rice flour lends itself to a chewy, slightly sticky consistency that should be neither too dense nor too fluffy. Avoid overmixing the batter, as this can lead to a tougher texture. Letting it cool completely before cutting is also essential, as it further enhances the chewy quality.
Serving Suggestions and Pairings
Butter Mochi can be enjoyed on its own, but it can also be paired with various toppings to enhance its flavor. A dusting of powdered sugar or a drizzle of coconut cream can elevate the dessert's tropical context. Additionally, serving it with fruit like mango or a scoop of vanilla ice cream can provide a refreshing contrast to the rich, buttery mochi.
FAQs
What should I do if my butter mochi turns out too dense?
If your Butter Mochi is too dense, it might be due to overmixing the batter. Make sure to mix just until combined, as over-mixing can lead to a tougher texture.
Can I use sweetened coconut milk instead of unsweetened?
Yes, you can use sweetened coconut milk if you prefer a sweeter mochi. However, you may want to reduce the added sugar in the recipe to balance the sweetness.
What if my batter looks lumpy before baking?
It's normal for the batter to be slightly lumpy due to the glutinous rice flour. Just ensure there are no large lumps, and stir gently until it's mostly smooth.
Can I flavor my butter mochi with other extracts?
Absolutely! You can experiment with different extracts like almond or coconut to customize the flavor. Just use the same amount as the vanilla extract in the recipe.
How can I ensure my butter mochi bakes evenly?
To promote even baking, spread the batter evenly in the greased baking dish. Additionally, rotating the dish halfway through baking can help achieve uniform results.
What should I do if my butter mochi doesn’t rise as expected?
If your mochi doesn’t rise much, it might be a sign of old baking powder. Ensure it’s fresh and store it properly to maintain its potency for better results.
Conclusion
Hawaiian Butter Mochi is not just a dessert; it's a celebration of flavors and textures that transports you straight to the Islands with each bite. The combination of coconut, butter, and a chewy, cake-like consistency creates a unique experience distinct to Hawaiian cuisine.
By following this recipe, you can recreate this beloved treat in the comfort of your home, bringing a taste of Hawaii to your table. Share it with family and friends, and savor the smiles that come with every delicious square!
Recipe Card
Notes
Additional serving suggestions: pair with a crisp salad, garlic bread, or roasted seasonal vegetables for balance.
For make-ahead, prep components separately and assemble just before heating to preserve texture.
Taste and adjust with acid (lemon/vinegar) and salt right at the end to wake up flavors.
