Introduction
Finding quick and delicious dinner recipes can often feel like a daunting task for busy weeknights. Fortunately, Crispy Parmesan Crusted Chicken strikes the perfect balance between ease and flavor, making it a favorite among home cooks. This dish not only satisfies your cravings but also delivers a delightful crunch with every bite.
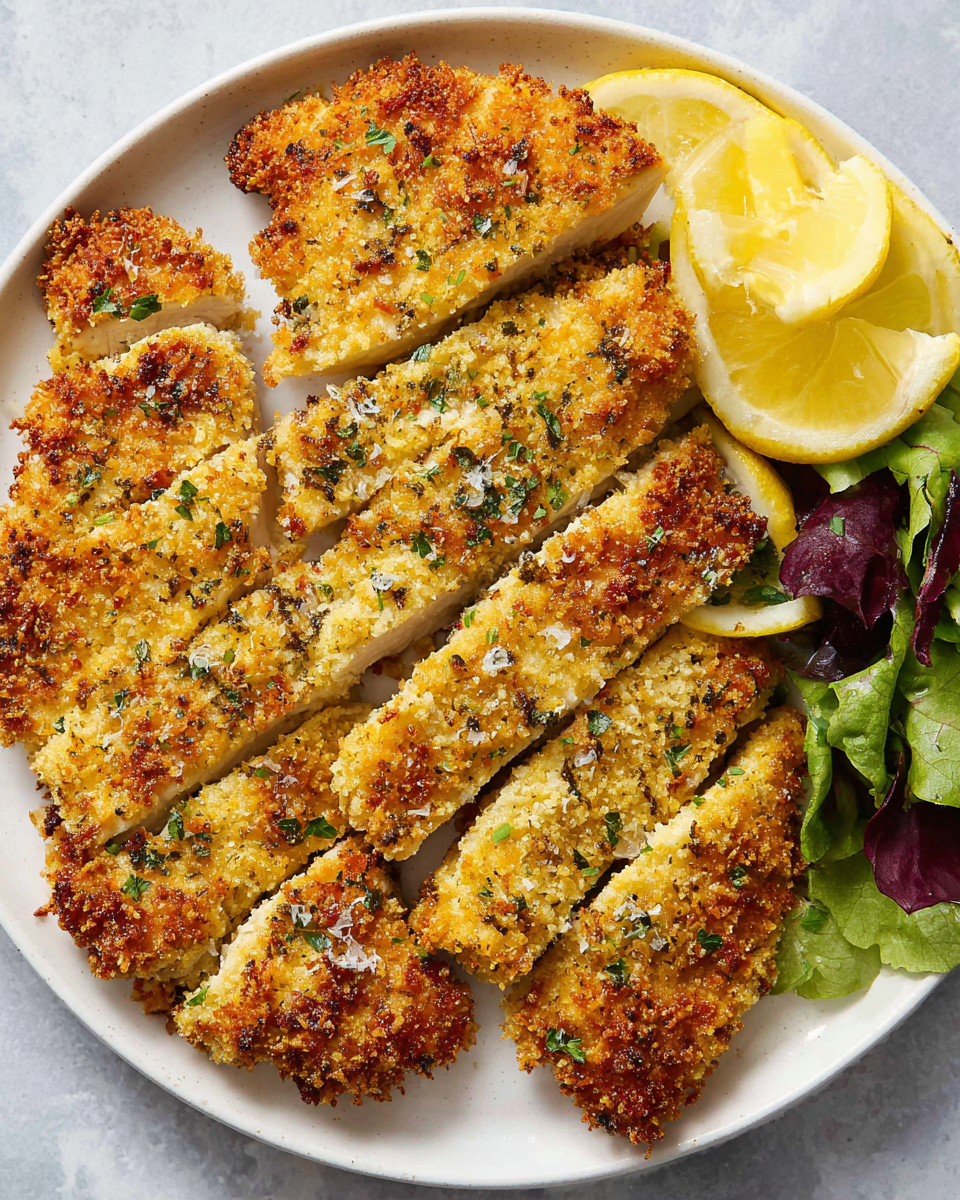
The combination of juicy chicken breasts coated in a savory Parmesan crust creates an irresistible meal that can be served with various sides, ensuring a complete dinner on your table in no time. Whether it’s for a family gathering or just a simple weeknight dinner, this recipe caters to all occasions.
Ingredients
- 4 boneless, skinless chicken breasts
Chicken breasts are the main protein source, providing a lean and tender base for the dish. They cook quickly and readily absorb flavors from the crust. - 1 cup Parmesan cheese, grated
Parmesan cheese adds a rich, nutty flavor and a golden, crispy texture when baked. It also encourages browning, enhancing both taste and appearance. - 1 cup breadcrumbs
Breadcrumbs provide a crunchy coating that complements the melty cheese, creating a satisfying contrast in texture while also helping the crust adhere to the chicken. - 1 egg, beaten
The egg acts as a binding agent, ensuring that the breadcrumbs and cheese stick to the chicken. It also helps achieve a nicely crisp surface when baked or fried. - 1 teaspoon garlic powder
Garlic powder adds depth to the flavor profile, contributing a hint of pungency without overpowering the dish. - 1 teaspoon Italian seasoning
This blend of herbs adds a Mediterranean flair, infusing the chicken with warm, aromatic flavors that deepen the overall taste. - Salt and pepper, to taste
Basic seasoning is crucial; salt enhances all the flavors, while pepper adds a subtle kick, balancing the dish perfectly. - 2 tablespoons olive oil
Using olive oil helps with browning the crust while also adding a fruity richness to the dish. It's essential for achieving that golden color both in the oven or on the stovetop.
Directions & Preparation
Step 1: Preheat the oven to 400°F (200°C).
Preheating the oven ensures that the chicken begins cooking immediately once placed inside, promoting even cooking and crispy results. A hot oven is key for the crust to achieve that desirable texture.
Step 2: Prepare the chicken breasts by patting them dry with a paper towel.
Drying the chicken breasts helps the coating adhere better and ensures that any excess moisture won't steam the chicken during cooking, allowing for a crispier crust.
Step 3: In a shallow bowl, combine the breadcrumbs, grated Parmesan, garlic powder, Italian seasoning, salt, and pepper.
Mixing these ingredients together allows the spices and cheese to be evenly distributed, ensuring a consistent flavor across the crumbs, which is essential for a well-seasoned crust.
Step 4: In a separate bowl, beat the egg and set aside.
Beating the egg helps it emulsify, which will serve as an effective glue for the breadcrumbs and cheese mix, facilitating a perfect coating on the chicken.
Step 5: Dip each chicken breast into the egg, then coat with the breadcrumb mixture, pressing firmly to adhere.
This step ensures that each chicken breast is generously covered with the savory mixture. The pressing action helps it cling well during cooking, resulting in a more uniform crust.
Step 6: Heat olive oil in a large oven-proof skillet over medium heat.
Using a skillet that can go into the oven allows for a two-in-one cooking method, where the chicken gets a nice sear before finishing in the oven, ensuring a crispy exterior while remaining moist inside.
Step 7: Once hot, add the coated chicken breasts to the skillet, cooking for 3-4 minutes on each side or until golden brown.
Searing the chicken provides a delicious crust and locks in moisture. This step is crucial, as it significantly affects the texture and flavor, complementing the subsequent baking.
Step 8: Transfer the skillet to the preheated oven and bake for 15-20 minutes until the chicken is cooked through.
Baking in the oven ensures that the chicken cooks evenly without burning the crust. This step also allows the cheese to melt and create a beautiful, golden finish without overcooking the meat.
Step 9: Remove the skillet from the oven and let the chicken rest for a few minutes before serving.
Resting the chicken allows the juices to redistribute throughout the meat, making it more tender and flavorful. Cutting into it too soon may result in a dry texture due to the loss of juices.

Elevating Flavor with Seasoning
Enhancing the flavor of your Crispy Parmesan Crusted Chicken doesn't end with just garlic powder and Italian seasoning. You can infuse additional flavorings such as paprika for smokiness, or even red pepper flakes for a kick. Experimenting with these spices can add layers of depth, making the dish your own and tailoring it to family preferences.
Serving Suggestions to Complement the Dish
This chicken pairs well with various sides that can elevate the meal. Consider serving it atop a bed of arugula for a fresh salad contrast, or alongside roasted vegetables for a hearty addition. Alternatively, mashed potatoes or a quick pasta toss can round out the meal beautifully, making a well-balanced and delicious dinner.
Making It Your Own with Variations
This crispy chicken recipe is versatile, allowing for numerous variations. Swap out the Parmesan for a blend of your favorite hard cheeses or experiment with gluten-free breadcrumbs for dietary needs. You can also try adding fresh herbs like chopped parsley or basil into the breadcrumb mixture for a garden-fresh twist.
FAQs
What if the chicken isn’t crispy enough after baking?
If the chicken lacks crispiness, consider broiling it for the last few minutes of cooking. This will enhance browning and texture. Just watch it closely to avoid burning.
Can I prepare the chicken in advance?
Yes, you can coat the chicken and refrigerate it for a few hours before cooking. This resting time allows the flavors to meld, enhancing the taste.
What should I do if my coating becomes too thick?
If the coating feels excessively thick, lightly tap off any excess before cooking. An overly thick layer can lead to uneven cooking and texture issues.
Could I use a different type of cheese instead of Parmesan?
Absolutely! Cheddar, Gouda, or a blend of Italian cheeses can provide different flavor profiles, transforming the dish while still maintaining that crucial crispy crust.
How can I ensure my chicken does not overcook?
Using a meat thermometer is the most reliable method; chicken should reach 165°F (74°C) for safe consumption. This will help avoid dryness.
What can I do if I find the chicken bland?
If you find the chicken lacks flavor, try incorporating more seasoning into the breadcrumb mixture or marinating the chicken briefly in your favorite vinaigrette prior to coating.
Conclusion
Crispy Parmesan Crusted Chicken is a delightful dish that transforms an ordinary weeknight dinner into something truly special. Its simplicity and flavor make it an ideal go-to meal for busy nights that need a touch of comfort and satisfaction.
So next time you're searching for an easy yet impressive dinner idea, remember this recipe. With minimal preparation and cooking time, it's bound to become a staple in your home kitchen and a new favorite among family and friends.
Recipe Card

Savory Ground Beef Dishes for Cozy Evenings
Ingredients
- 1 lb ground beef
- 1 medium onion diced
- 2 cloves garlic minced
- 1 can 14 oz diced tomatoes
- 1 tablespoon chili powder
- 1 teaspoon cumin
- Salt and pepper to taste
- Toppings of your choice avocado, cheese, cilantro
Instructions
- Heat a large skillet over medium heat.
- Add diced onions and sauté until translucent.
- Add minced garlic and cook for an additional minute.
- Increase the heat to medium-high and add the ground beef.
- Stir in the diced tomatoes, chili powder, cumin, salt, and pepper.
- Reduce heat and let simmer for about 10 minutes.
- Serve hot, topped with your choice of toppings.
Notes
Additional serving suggestions: pair with a crisp salad, garlic bread, or roasted seasonal vegetables for balance.
For make-ahead, prep components separately and assemble just before heating to preserve texture.
Taste and adjust with acid (lemon/vinegar) and salt right at the end to wake up flavors.


