Introduction
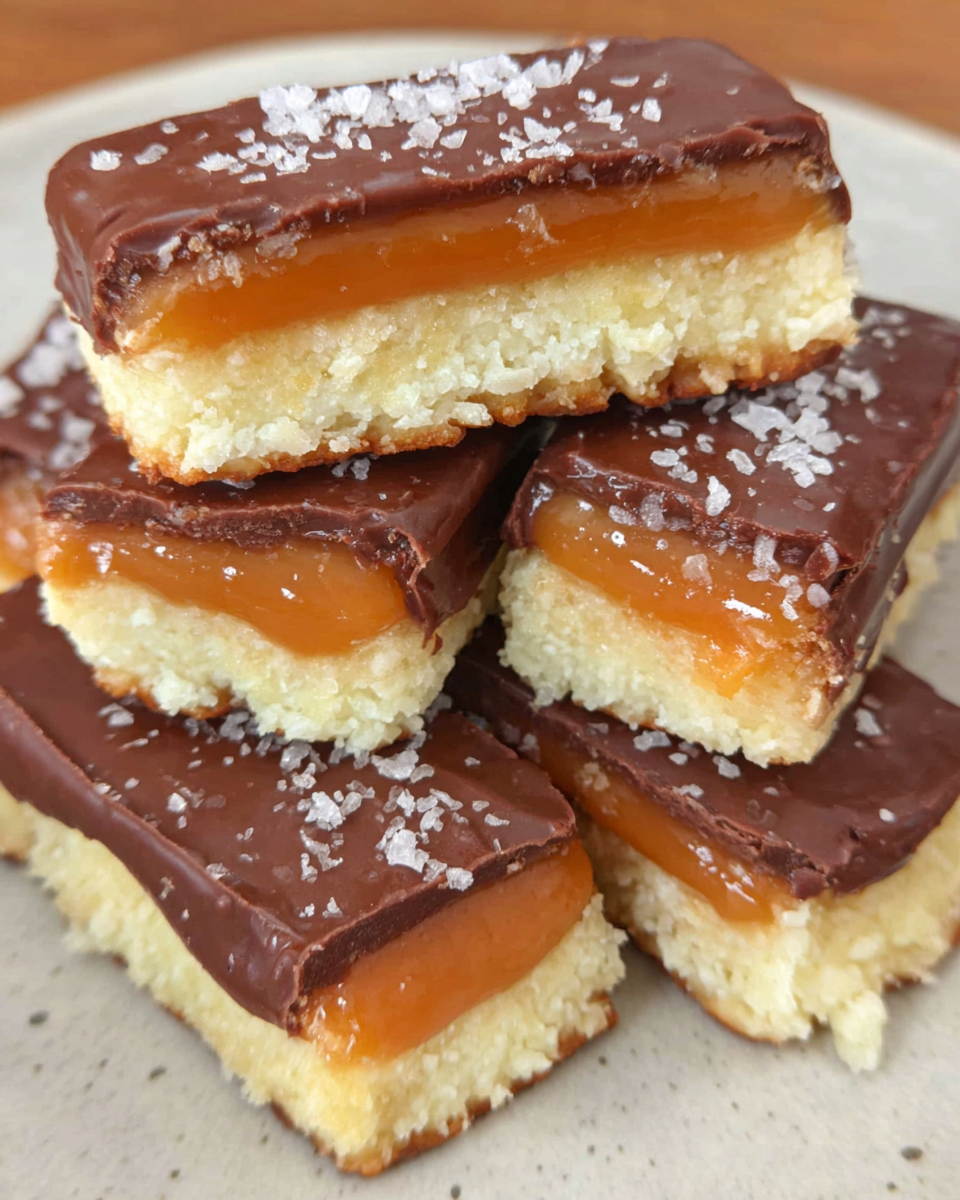
If you're craving something satisfyingly sweet yet compliant with your ketogenic lifestyle, these Keto Twix Bars are the perfect answer. Combining a crunchy base, a smooth sugar-free caramel layer, and a rich chocolate coating, these bars offer all the indulgence of the classic candy without the carbs.
While traditional Twix bars are filled with sugar and empty calories, this homemade alternative harnesses the power of low-carb ingredients. It's not just a treat; it’s a guilt-free dessert that fits perfectly into your healthy eating regimen, making each bite a realistic and enjoyable part of your lifestyle.
Ingredients
- 1 cup almond flour
Almond flour is a staple in keto baking, providing a nutty flavor and a delicate texture that mimics traditional flour while keeping carbs low. It’s high in healthy fats and proteins, making it an excellent choice for maintaining energy levels. - 1/4 cup coconut flour
Coconut flour adds a subtle sweetness and helps to absorb moisture in keto recipes. It's very fiber-rich, aiding in digestion and giving a satisfying texture to the bars without elevating carbohydrate counts. - 1/4 cup erythritol
This sugar substitute provides sweetness without the calories of sugar, making it perfect for keto desserts. Erythritol has a low glycemic index and doesn’t lead to sugar spikes, allowing you to enjoy sweetness while staying on track. - 1/4 cup unsweetened cocoa powder
Cocoa powder brings a deep chocolate flavor crucial for the top layer of these bars. It’s rich in antioxidants and can enhance the overall health benefits of your dessert. - 1/2 cup unsalted butter
Butter adds richness and binds the ingredients together, contributing to the creamy texture of both the base and the caramel. It also brings healthy fats to the recipe, supporting a ketogenic diet. - 1/2 cup sugar-free condensed milk
This sweet ingredient creates that luscious caramel layer, providing creaminess without the added sugar. Look for brands that align with low-carb standards to keep your bars perfect for keto. - 1 teaspoon vanilla extract
Vanilla extract enhances the sweetness and provides a warm, aromatic flavor that rounds out the dessert. Its rich taste makes the treat feel indulgent despite its health-conscious ingredients. - 1/2 cup sugar-free chocolate chips
These chocolate chips are key for creating the smooth chocolate coating. They provide the same rich taste without the illicit sugar, making the bars even more satisfying.
Directions & Preparation
Step 1: Make the base layer by mixing almond and coconut flours, erythritol, and melted butter until well combined.
The mixing process is crucial for ensuring a uniform texture in your base layer. You want to blend the ingredients until they resemble a crumbly dough, making it easy to press into your pan. If it feels too dry, adding a splash of water can help bind it.
Step 2: Press the mixture into a lined pan evenly and pre-bake for 10 minutes at 350°F (175°C).
Pre-baking the base helps set the structure before adding the caramel layer. This step ensures that the bars won’t crumble apart when you cut them later. Look for a slightly golden color to indicate they are ready.
Step 3: While the base cools, prepare the sugar-free caramel by heating unsweetened condensed milk and a bit of butter until melty and smooth.
Heating these ingredients allows them to blend beautifully, creating a smooth and rich caramel. Stir continuously to prevent burning and to ensure it doesn’t separate. The caramel should be glossy and thick before moving on.
Step 4: Pour the caramel over the cooled base layer, spreading it evenly, and refrigerate until set.
Chilling the caramel solidifies it, creating a delightful layer that contrasts the crunchy base. Make sure to let it set properly; if it’s too soft, the bars won’t hold their shape when sliced.
Step 5: Melt the sugar-free chocolate chips and drizzle them over the set caramel layer, then return to the fridge.
Melting the chocolate requires careful attention to avoid overheating; a double boiler works best. The chocolate should be glossy and smooth for easy drizzling. Once set, this layer creates a delicious crunch as you bite into the bars.
Step 6: After the chocolate has hardened, slice the bars into squares and serve.
Cutting while the chocolate is firm ensures there’s a clean edge without the filling oozing out. Use a sharp knife for clean cuts, and consider warming the blade slightly for an even neater finish.

Creating Delicious Sugar-Free Caramel
The sugar-free caramel layer of these bars is what truly sets them apart from their traditional counterparts. Made with sugar-free condensed milk and butter, this caramel is rich and satisfying. Cooking it to the right consistency is vital—too thick and it won't spread; too thin and it won't hold its shape. The quick cooling process also helps keep it well-defined without losing that delightful chew.
Selecting the Right Chocolate for Topping
When picking sugar-free chocolate chips, look for options made with high-quality cocoa and minimal fillers. Their taste can vary widely, affecting the overall flavor of your bars. A good rule of thumb is to choose chips that melt smoothly and have a rich cocoa flavor, as these will enhance the layered experience of the dessert and deliver that crave-worthy sweetness.
Tips for Achieving the Perfect Crunch
The crunchiness of the base is what mimics that delightful experience of biting into a classic Twix. Pressing the dough firmly into the pan and pre-baking it ensures it develops a sturdy texture. Monitor your baking times carefully; removing the base just as it starts to brown can yield that perfect buttery crunch while preventing any dryness.
FAQs
What can I do if my caramel is too thick?
If your caramel turns out too thick, you can gently reheat it with a splash of almond milk or water to loosen it up. Stir constantly until it reaches the desired pouring consistency.
Can I use a different sweetener besides erythritol?
Yes, you can opt for another sugar substitute, like monk fruit or stevia. Just ensure it measures similarly to erythritol to keep the balance of flavors consistent.
What if my chocolate layer isn't melting smoothly?
If your chocolate is clumping or not melting well, avoid direct high heat. Instead, use the microwave on low power, or a double boiler to gently melt it. Stir frequently until smooth.
How can I adjust the thickness of my base layer?
Adjusting the thickness involves altering the amount of flour used; adding a bit more can create a thicker crust, while reducing it will yield a thinner base. Keep an eye on the baking time as well.
Can I add nuts to my filling for extra texture?
Absolutely! Chopped pecans or almonds could complement the flavors and add crunch. Just mix them into the caramel layer before it sets.
What should I do if my bars crumble when cutting?
If the bars crumble, it likely means the base wasn’t baked long enough or pressed too loosely. Next time, ensure the base is firmly packed and check for a slightly golden crust before cooling.
Conclusion
Creating these Keto Twix Bars is not only simpler than you might think, but it’s also a delightful way to satisfy your sweet tooth without abandoning your dietary goals. The layers come together to create a snack that's both pleasing to the palate and supportive of your low-carb lifestyle.
So go ahead, indulge in this homemade treat whenever the craving strikes. With a little patience and the right ingredients, you can enjoy the rich flavors of caramel and chocolate in a keto-friendly way.
Recipe Card

Sweet and Savory Honey Garlic Chicken Thighs
Ingredients
- 4 chicken thighs
- 1/2 cup honey
- 1/4 cup soy sauce
- 4 cloves garlic minced
- 1 tablespoon apple cider vinegar
- 1 teaspoon ground ginger
- 1 tablespoon cornstarch optional
- Salt and pepper to taste
Instructions
- Prepare the sauce by mixing honey, soy sauce, garlic, ginger, and vinegar.
- Place chicken thighs in the crock pot and season with salt and pepper.
- Pour the honey garlic sauce over the chicken, ensuring it's well coated.
- Cover and cook on low for 6-8 hours or high for 3-4 hours.
- If using cornstarch, remove chicken 30 minutes before cooking is done.
- Once done, shred or serve the chicken whole, alongside the sauce.
Notes
Additional serving suggestions: pair with a crisp salad, garlic bread, or roasted seasonal vegetables for balance.
For make-ahead, prep components separately and assemble just before heating to preserve texture.
Taste and adjust with acid (lemon/vinegar) and salt right at the end to wake up flavors.


