Introduction
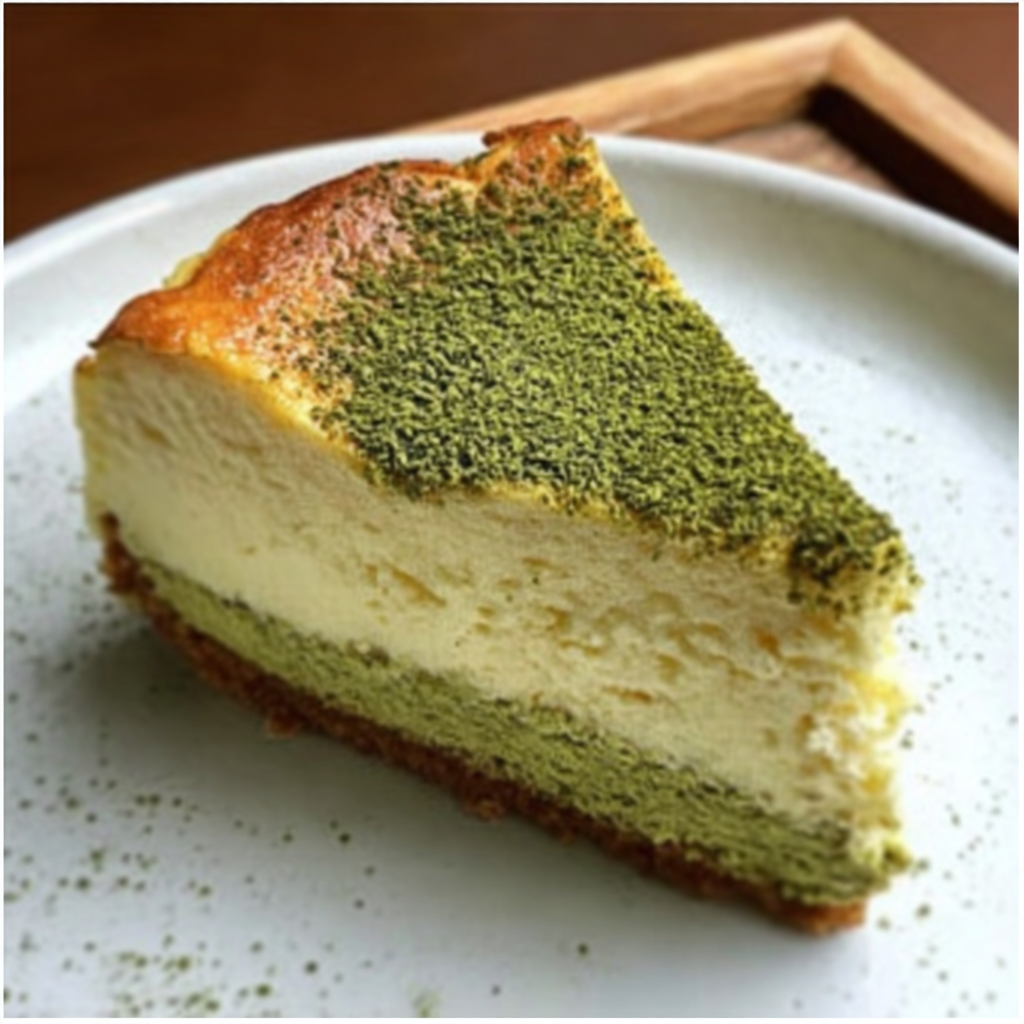
The rich, vibrant green hue of matcha combined with the creamy decadence of cheesecake creates a dessert that captures attention and delights the palate. This three-layer matcha cheesecake is not only visually stunning but also a celebration of flavors that dance on your tongue. It merges the earthiness of matcha with the creamy richness of cream cheese, making it a perfect treat for special occasions or a cozy night in.
Creating this cheesecake is an artful process that results in a dessert that is both sophisticated and comforting. Each layer brings a unique texture, leading to a multi-dimensional experience that is simply irresistible. Whether you are a seasoned baker or a beginner, this matcha cheesecake recipe will guide you through each step with encouraging details to ensure your creation melts hearts.
Ingredients
- 1 1/2 cups graham cracker crumbs
These crumbs form the base of the cheesecake, providing a sweet, crunchy texture that contrasts beautifully with the creamy layers above. - 1/3 cup unsalted butter, melted
Melted butter binds the graham cracker crumbs together, ensuring a firm, cohesive crust that holds the layers of cheesecake. - 1/2 cup granulated sugar
Sugar not only sweetens the cheesecake but also helps in creating a silky smooth texture when blended with the cream cheese. - 16 ounces cream cheese, softened
Cream cheese is the primary ingredient that gives the cheesecake its rich, creamy consistency, making it indulgent and luscious. - 1 cup sour cream
Sour cream adds a tangy flavor that balances the sweetness and enhances the creaminess of the cheesecake. - 3 large eggs
Eggs serve as a binding agent, providing structure and richness to the cheesecake while helping it to set as it bakes. - 2 tablespoons matcha powder
Matcha adds a vibrant color and unique flavor that defines the essence of this cheesecake, imparting both earthiness and a slight bitterness. - 1 teaspoon vanilla extract
Vanilla extract enhances the overall flavor profile, adding depth and warmth that complements the matcha. - 1/4 cup heavy cream
Heavy cream contributes to the cheesecake’s thickness and adds an extra layer of richness that elevates its overall indulgence.
Directions & Preparation
Step 1: Preheat the oven to 350°F (175°C).
Preheating the oven is crucial as it ensures that the cheesecake bakes evenly right from the start. This step helps prevent unwanted cracks in the surface of your cheesecake.
Step 2: Prepare the crust by mixing graham cracker crumbs and melted butter.
Mixing the graham cracker crumbs with melted butter creates a binding mixture that will hold your crust together. Make sure the crumbs are evenly coated for consistent texture throughout.
Step 3: Press the crumb mixture into a 9-inch springform pan.
Pressing the crumb mixture firmly into the pan is essential for a sturdy base that won’t crumble when you slice the cheesecake. Use the bottom of a measuring cup to ensure an even layer.
Step 4: Bake the crust for 10 minutes and let it cool.
Baking the crust allows it to set, creating a firm foundation for the layers above. This step also enhances the flavor of the crust by toasting the crumbs.
Step 5: In a large bowl, beat the cream cheese and sugar until smooth.
Beating the cream cheese and sugar thoroughly is vital for achieving a uniformly smooth texture. Make sure there are no lumps, as they will affect the final cheesecake.
Step 6: Add the sour cream, eggs, vanilla, and mix until well combined.
Incorporating sour cream, eggs, and vanilla at this stage enriches the batter while adding flavor and creaminess. Mix only until combined to avoid over-beating.
Step 7: Divide the batter into three bowls—one for the plain layer, one for matcha, and set aside the last for the top layer.
Dividing the batter allows for the creation of distinct layers in the cheesecake, each with its unique flavor. It’s important to handle the batter gently to maintain airiness.
Step 8: Add matcha to one bowl and mix well.
Incorporating matcha into one-third of the batter infuses the cheesecake with a rich green color and distinct flavor. Ensure the matcha is fully mixed for an even distribution.
Step 9: Pour the plain batter into the cooled crust, followed by the matcha layer, then finish with the remaining plain batter.
Layering the batter in this order not only visualizes the beautiful three layers but also ensures that each slice displays a stunning color contrast. Pour slowly to prevent mixing.
Step 10: Bake for 45 minutes or until the center is set but slightly wobbly.
Baking until the center is slightly wobbly indicates that the cheesecake will continue to set as it cools. Avoid overbaking, as this can lead to cracks and dryness.
Step 11: Turn off the oven and let the cheesecake cool inside for an hour.
Allowing the cheesecake to cool gradually in the oven helps prevent sudden temperature changes that can cause cracks. This method also enhances the cheesecake's texture.
Step 12: Chill the cheesecake in the refrigerator for at least 4 hours or overnight.
Chilling the cheesecake allows the flavors to meld beautifully and enhances its creamy texture. A longer chilling time ensures the cheesecake is perfectly set.
Step 13: Garnish and serve.
Garnishing your cheesecake adds a personal touch and enhances presentation. Consider using matcha powder, fresh fruits, or whipped cream to elevate its visual appeal and taste.

The Magic of Matcha: A Flavorful Twist
Matcha, the finely ground powder of specially grown green tea leaves, brings not only its signature vibrant hue but also a distinct rich flavor profile that is both earthy and slightly sweet. This unique flavor adds a sophisticated edge to the classic cheesecake, making it a perfect blend of East meets West. The incorporation of matcha elevates the experience, turning a traditional dessert into something extraordinary.
Texture Mastery: Layers that Delight
This cheesecake’s three distinct layers create a textural contrast that is as pleasing to the palate as it is to the eye. The creamy layers melt in your mouth, while the crust provides a satisfying crunch. Achieving this balance in textures is essential for a memorable dessert experience, inviting everyone to relish each bite as they savor the richness of the cheesecake.
Serving Suggestions: Elevate Your Dessert Experience
For an elegant touch, serve slices of matcha cheesecake with fresh berries or a drizzle of white chocolate ganache. Adding a dollop of light whipped cream can complement the flavors beautifully, while a sprinkle of extra matcha on top enhances the presentation. Each of these accompaniments not only amplifies the visual appeal but also adds layers of flavor that elevate this delightful dessert.
FAQs
What if the cheesecake cracks during baking?
If you notice cracks, it typically means the cheesecake was baked too long. To avoid this, ensure you bake until just set and allow it to cool gradually.
Can I use a different type of crust?
Absolutely! You can experiment with different crusts, such as an Oreo or fruit-based crust, to create a unique flavor profile for your cheesecake.
What can I do if my cheesecake is too thick?
To adjust the thickness, you can fold in a bit more sour cream or heavy cream to lighten the texture before baking.
How do I ensure my matcha flavor is pronounced?
Using high-quality matcha and adjusting the quantity slightly will enhance its flavor. Experimenting with the matcha brand can also yield different intensities.
What should I do if my cheesecake feels too soft after chilling?
If it’s soft, it may need additional chilling time. Make sure it has been in the refrigerator for at least four hours, preferably overnight for the best texture.
Can I add other flavors to the cheesecake layers?
Yes, you can incorporate flavors like lemon zest, raspberry purée, or chocolate to any of the layers for a delicious twist.
Conclusion
Making an irresistible 3-layer matcha cheesecake is an adventure that promises a rewarding outcome, both in taste and presentation. The blending of textures and flavors creates a dessert that not only satisfies sweet cravings but also leaves lasting memories with every slice shared.
Embrace the process and enjoy each step of creating this masterpiece. With a bit of patience and attention to detail, you can achieve a show-stopping dessert that is sure to melt hearts at any gathering.
Recipe Card
Notes
Additional serving suggestions: pair with a crisp salad, garlic bread, or roasted seasonal vegetables for balance.
For make-ahead, prep components separately and assemble just before heating to preserve texture.
Taste and adjust with acid (lemon/vinegar) and salt right at the end to wake up flavors.