Introduction
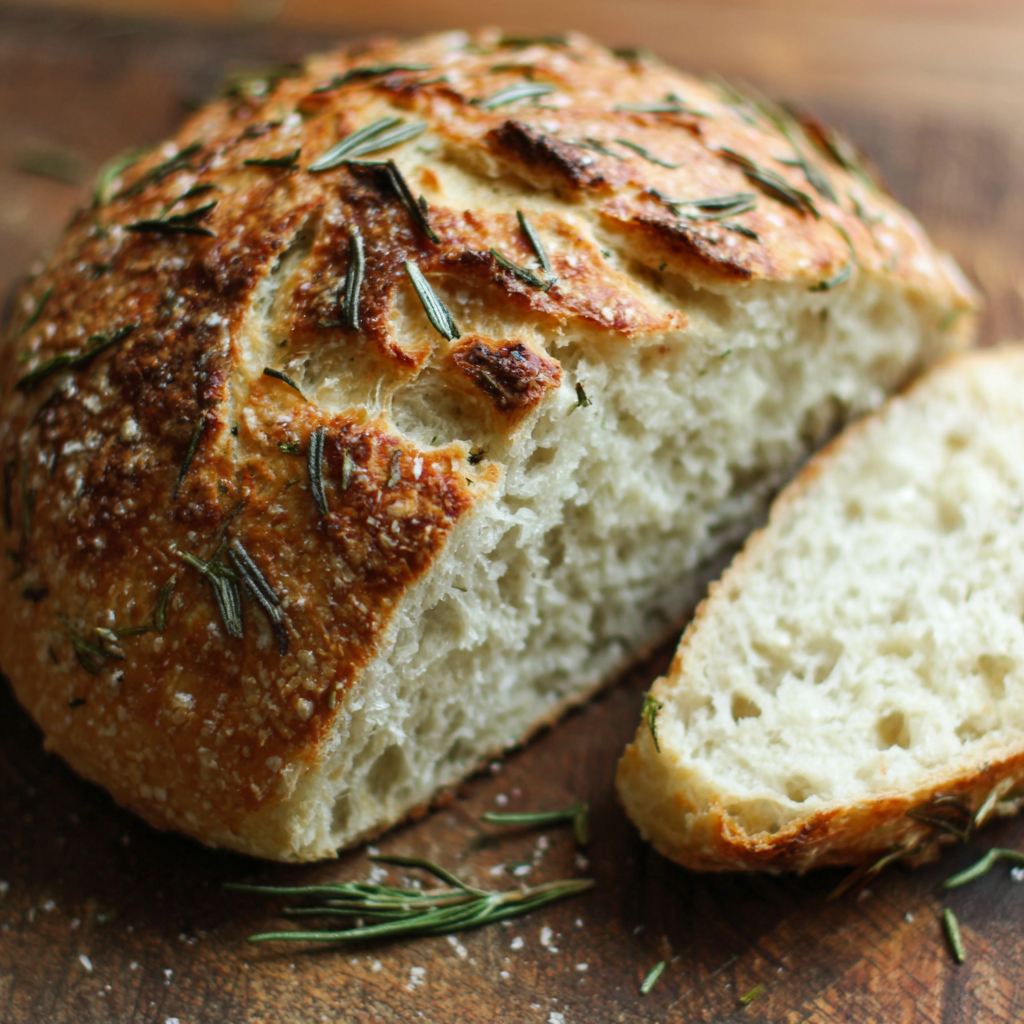
There's something magical about the aroma of freshly baked bread, especially when it’s infused with the earthy notes of rosemary and the pungent warmth of garlic. Rustic no-knead bread is utterly satisfying, both in preparation and consumption. This version allows you to harness the power of time over effort, creating a loaf that is crisp on the outside and tender within.
Ideal for dipping in olive oil or simply enjoying with butter, this bread elevates any meal. Whether you’re hosting a dinner party or enjoying a cozy night in, the simplicity and fragrance of this rustic creation make it irresistible. Plus, the minimal effort and time commitment make it accessible for even the busiest home cooks.
Ingredients
- 4 cups all-purpose flour
The base of our bread, all-purpose flour provides structure and stability. Its gluten content allows the dough to rise while still achieving that rustic, chewy texture. - 1 ¾ teaspoons salt
Salt not only enhances flavor but also strengthens the gluten structure of the dough. It plays a crucial role in regulating yeast activity, leading to a better rise. - 1 teaspoon dried instant yeast
This ingredient is responsible for fermentation, helping the dough to rise and develop flavor. Instant yeast is convenient and eliminates the need for proofing. - 2 cups warm water
Water hydrates the flour, beginning the dough formation. Warm water activates the yeast, promoting fermentation and resulting in a beautifully aerated loaf. - ¼ cup fresh rosemary, chopped
Rosemary adds fragrant, herbal notes to the bread. Fresh herbs provide a vibrant flavor that contrasts beautifully with the rich, savory garlic. - 6 cloves garlic, minced
Garlic infuses the bread with a savory depth, complementing the rosemary and adding a delightful aroma. Roasted or sautéed garlic can also offer a sweeter flavor profile. - Olive oil for greasing
Using olive oil not only prevents sticking but also adds a rich flavor to the crust, enhancing the overall taste of your bread.
Directions & Preparation
Step 1: Combine dry ingredients.
In a large mixing bowl, thoroughly whisk together the flour, salt, and instant yeast. This step is essential to ensure even distribution of the salt and yeast throughout the flour, which leads to a consistent rise and helps develop the bread’s unique flavor.
Step 2: Add warm water and mix.
Pour the warm water into the bowl with the dry ingredients and use a wooden spoon to combine until a shaggy dough forms. Mixing by hand keeps the process simple and allows you to feel the dough's texture. It’s okay if the mixture appears somewhat rough; it will come together during the resting phase.
Step 3: Incorporate garlic and rosemary.
Fold the minced garlic and chopped rosemary into the dough, making sure it is evenly distributed. This step infuses the entire loaf with aromatic flavors. Don't worry about overworking the dough; you want to keep its texture rustic.
Step 4: Cover and rest the dough.
Cover the bowl with plastic wrap or a damp kitchen towel and let it rise at room temperature for 12-18 hours. This long fermentation period allows for the development of complex flavors and gluten structure without the need for kneading.
Step 5: Prepare the baking surface.
After the resting period, preheat your oven to 450°F (230°C) and place a Dutch oven inside to heat up. This step creates a steamy environment for baking, which is crucial for achieving that thick crust that characterizes artisanal bread.
Step 6: Shape the dough.
Flour a countertop and turn out the dough onto it. With floured hands, gently shape it into a ball, being careful not to deflate it too much. This shaping technique helps create surface tension, which promotes a rise during baking.
Step 7: Let the dough rise again.
Place the shaped dough on a piece of parchment paper and cover it with a towel for about 30 minutes. This short second rise enhances the bread’s overall texture and allows it to puff up slightly, ensuring a light bread.
Step 8: Bake the bread.
Using oven mitts, carefully remove the hot Dutch oven and lift the parchment paper to transfer the dough into it. Cover it with the lid and bake for 30 minutes. The covered pot traps steam, allowing the bread to rise and develop a crust.
Step 9: Remove the lid and finish baking.
After 30 minutes, remove the lid and bake for an additional 15-20 minutes until the loaf is golden brown. This step allows the crust to develop a beautiful, crunchy texture while the interior remains soft and airy.
Step 10: Cool before slicing.
Once baked, carefully remove the bread from the Dutch oven and allow it to cool on a wire rack for at least 30 minutes. This cooling period is essential for setting the crumb structure and flavor. Slicing too early can result in a gummy texture.

Why No-Knead Bread Works
The magic of no-knead bread lies in its reliance on time rather than effort. The long fermentation allows the flour to fully absorb water, promoting gluten development and creating an airier structure. This method results in a uniquely flavored bread, with a crispy crust and an open crumb, without the intricacies of traditional kneading methods. Perfect for those who want homemade bread without the hassle.
Flavor Boosts with Rosemary and Garlic
Rosemary and garlic are a classic duo that transform simple bread into a gourmet experience. The fresh, robust rosemary adds a fragrant lift, while the garlic imparts a savory richness that permeates the loaf. You can modify the amounts to suit your taste or even experiment by adding other herbs, creating an aromatic bakery-worthy bread that will impress family and friends.
Perfect Pairings for Rustic Bread
This rustic bread pairs beautifully with a variety of dishes. Enjoy it alongside a warm bowl of soup, as a base for bruschetta, or simply with a drizzle of high-quality olive oil for dipping. The chewy texture and artisan crust make it an excellent foundation for an elegant charcuterie board, perfect for any gathering or cozy nights at home.
FAQs
What if my dough is too sticky?
If your dough appears too sticky after mixing, you can add additional flour a tablespoon at a time. Be cautious not to overdo it, as the dough should remain wet for optimal texture.
Is it okay to use dried rosemary instead of fresh?
Yes, while fresh rosemary offers a vibrant flavor, dried rosemary can be used. Use about one tablespoon of dried rosemary as it has a more concentrated flavor.
What should I do if my bread is too dense?
If your bread turns out dense, it may be due to insufficient rising time or not enough water in the dough. Ensure you're allowing your dough enough time to ferment and rise thoroughly.
Can I add cheese to the bread?
Absolutely! Adding cheese such as grated Parmesan or crumbled feta will create a delicious savory twist in your bread. Incorporate it gently into the dough during the mixing stage.
How can I ensure a crispy crust?
For a crispy crust, make sure your Dutch oven is preheated properly before baking the bread. The initial steam created will help develop that coveted crust!
Can I double the recipe?
Yes, you can double the recipe. Just be sure your mixing bowl is large enough for the increased volume and allow for extra time during the fermentation process.
Conclusion
Baking rustic no-knead rosemary garlic bread is an accessible way to achieve bakery-quality results at home. The combination of simple ingredients and minimal effort yields a deeply flavorful loaf that you can be proud to serve.
Next time you're in the mood for comforting homemade bread, remember this recipe. Once you taste the warm, fragrant result, you'll find yourself making it again and again, sharing its delights with everyone around you.
Recipe Card
Notes
Additional serving suggestions: pair with a crisp salad, garlic bread, or roasted seasonal vegetables for balance.
For make-ahead, prep components separately and assemble just before heating to preserve texture.
Taste and adjust with acid (lemon/vinegar) and salt right at the end to wake up flavors.


