
Introduction
Hot ham and cheese sliders are the epitome of comfort food, combining savory ham with gooey cheese, all nestled between soft, buttery rolls. Perfect for parties, game day gatherings, or a cozy family dinner, these sliders are sure to please a crowd.
The beauty of these sliders lies not only in their simplicity but also in their versatility. You can customize the flavors to suit your palate by choosing different types of ham or cheese, or even adding a hint of sweetness with a layer of mustard.
Whether you serve them as an appetizer or a main dish, these sliders promise to create a memorable culinary experience. The buttery, melty goodness will have everyone coming back for seconds—if not thirds!
Ingredients
- 12 slider buns
Slider buns are key to holding the filling while providing a soft, slightly sweet base that complements the savory ham and cheese. - 1 pound sliced ham
Choose from honey-baked, smoked, or black forest varieties to enhance the overall flavor profile of the sliders. - 8 slices Swiss cheese
Swiss cheese melts wonderfully and adds a creamy texture that pairs excellently with the ham's saltiness. - 1/2 cup unsalted butter, melted
Butter adds richness to the sliders as well as helps in browning the tops, creating a delightful crispy texture. - 2 tablespoons Dijon mustard
Dijon mustard gives a tangy kick and balances the richness of the ham and cheese, making every bite exciting. - 1 tablespoon poppy seeds (optional)
Poppy seeds add a delightful crunch and visual appeal, enhancing the overall presentation of the sliders.
Directions & Preparation
Step 1: Preheat your oven to 350°F (175°C).
Preheating the oven is crucial for ensuring the sliders bake evenly and develop that golden-brown crust. This step also sets the stage for the melting cheese, which needs consistent heat.
Step 2: Prepare a baking dish by lightly greasing it with cooking spray or butter.
Greasing the dish prevents the sliders from sticking and makes it easier to remove them after baking, ensuring they maintain their shape and delightful appearance.
Step 3: Slice the slider buns in half horizontally and place the bottom halves in the baking dish.
This creates a sturdy base for the filling. It's important to make a clean cut to help the top and bottom remain connected and easy to handle later.
Step 4: Spread a layer of Dijon mustard on the bottom halves of the buns.
Applying mustard at this stage infuses the bread with flavor and sets up a flavorful foundation that enhances every bite.
Step 5: Layer the sliced ham evenly over the mustard-covered buns.
Distributing the ham evenly ensures that each slider has the same amount of flavor and satisfaction, making for a more enjoyable eating experience.
Step 6: Place the Swiss cheese on top of the ham slices.
The cheese is crucial for adding creaminess and melding with the ham when melted. Be generous, as the cheese is a centerpiece of the flavor.
Step 7: Cap the sliders with the top halves of the buns.
This step is essential to create individual sliders that can be easily handled when served. It also keeps the cheese and ham contained during baking.
Step 8: Brush the melted butter over the top of the slider buns.
Brushing butter not only adds flavor but also promotes a beautiful golden color and crispy texture on the surface when baked.
Step 9: Sprinkle poppy seeds over the butter-brushed tops if desired.
Poppy seeds give a charming touch and additional texture without overpowering the main flavors. They also add to the visual appeal of the dish.
Step 10: Cover the baking dish with aluminum foil and bake for 15 minutes.
Covering ensures the sliders steam slightly, allowing the cheese to melt perfectly while keeping the buns soft. This step is vital for achieving the right texture.
Step 11: Remove the foil and bake for an additional 10 minutes, or until the tops are golden brown.
Finishing uncovered allows the tops to crisp up, creating a delightful contrast with the soft interior. Keep an eye on them to avoid burning.
Step 12: Remove from the oven and let cool for a few minutes before serving.
Allowing them to cool slightly helps set the layers, making the sliders easier to cut and serve without falling apart.
Step 13: Cut into individual sliders and serve warm.
Cutting them while warm ensures the cheese remains gooey and easy to pull apart, enhancing the overall eating experience with each delicious bite.

Tailoring Flavors to Your Taste
These hot ham and cheese sliders offer a canvas for creativity. Try adding caramelized onions or jalapeños for added depth and heat. Experimenting with different cheeses, like cheddar or pepper jack, can create a unique flavor profile that suits your preferences.
Perfect for Any Gathering
Whether it's a casual Friday night or a lively game day, these sliders are versatile enough to fit any occasion. They can be made in advance and baked just before guests arrive, making them a convenient choice for entertaining.
Serving Suggestions that Shine
Pair these sliders with a simple side salad or crispy sweet potato fries for a well-rounded meal. For a fun twist, serve them alongside a selection of dipping sauces like sriracha mayo or BBQ sauce to intensify the flavor experience.
FAQs
What if my melted butter isn't coating the buns evenly?
Ensure you're using a brush to distribute the butter thoroughly, or consider using a spray bottle for more even coverage over the tops.
Can I make sliders without ham?
Absolutely! You can substitute with turkey, roasted vegetables, or a mix of cheeses and herbs for a delightful vegetarian option.
What should I do if the cheese doesn't melt properly?
If the cheese isn't melting to your liking, you may need to bake for a few more minutes or increase the oven temperature slightly while watching carefully to avoid burning.
Can I use gluten-free buns for this recipe?
Yes, gluten-free slider buns work well too! Just make sure they're fresh to avoid a crumbliness that can occur with some gluten-free brands.
What can I add for a spicy kick?
Consider spreading some spicy mustard or adding sliced jalapeños between the ham and cheese layers for an extra burst of heat.
How can I make these sliders more visually appealing?
To enhance aesthetics, you can brush the tops with garlic butter, sprinkle with fresh herbs like parsley, or even add sliced olives before baking.
Conclusion
Hot ham and cheese sliders come together effortlessly, delivering every bite bursting with flavor and warmth. Their combination of melty cheese and savory ham is a timeless favorite, and their adaptability means every cook can make them their own.
Next time you’re planning a gathering or just want to indulge, give these sliders a try. You've got a recipe that not only satisfies hunger but also brings people together for a delightful shared experience.
Recipe Card
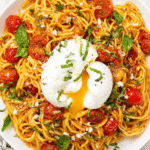
Creating a Delicious Burrata Pasta Experience
Ingredients
- 400 g pasta spaghetti or fettuccine
- 250 g burrata cheese
- 2 tablespoons olive oil
- 2 cloves garlic minced
- 300 g cherry tomatoes halved
- Fresh basil leaves for garnish
- Salt and pepper to taste
Instructions
- Cook the pasta according to package instructions.
- In a large skillet, heat olive oil over medium heat.
- Add minced garlic and halved cherry tomatoes to the skillet.
- Combine the drained pasta with the tomato mixture in the skillet.
- Fold in the burrata gently, allowing it to melt slightly.
- Season with salt and pepper, and garnish with fresh basil.
Notes
Additional serving suggestions: pair with a crisp salad, garlic bread, or roasted seasonal vegetables for balance.
For make-ahead, prep components separately and assemble just before heating to preserve texture.
Taste and adjust with acid (lemon/vinegar) and salt right at the end to wake up flavors.


