Introduction
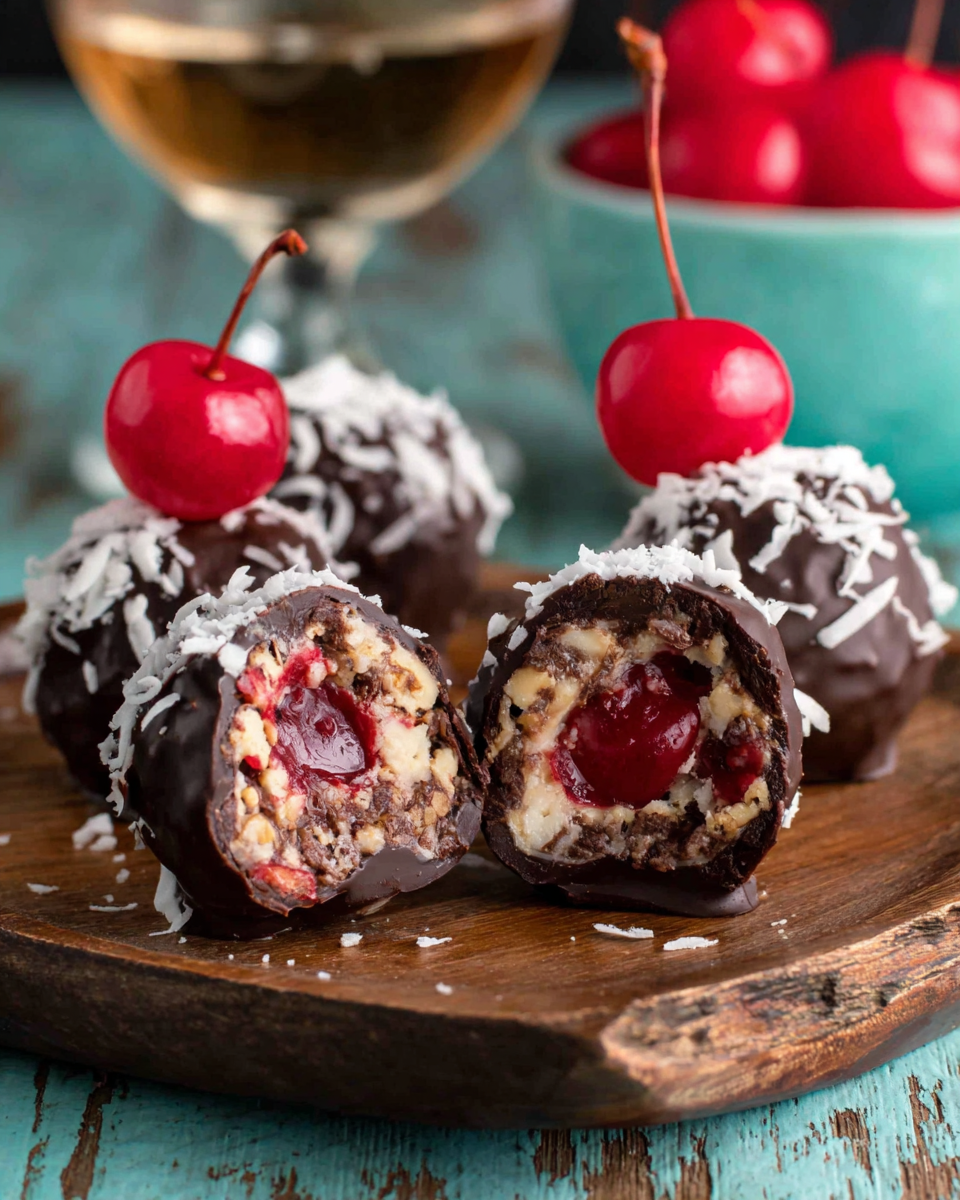
When it comes to no-bake desserts, few treats can compete with the rich, indulgent flavors of cherry bourbon balls. This easy-to-make confection is not only a crowd-pleaser but also the perfect addition to your next party or gathering. Combining the sweet-tart essence of cherries with the deep complexity of bourbon, these delectable bites are a delight for the palate.
These cherry bourbon balls stand out as a unique and whimsical dessert option. They allow home cooks to impress their guests without the need for extensive baking skills. The fusion of chocolate, nuts, and a hint of alcohol creates a harmonious treat that pairs beautifully with coffee or dessert wines, making them a versatile addition to any celebration.
As you prepare to make these treats, keep in mind the balance of flavors and textures. The cherries provide a juicy burst, while the nuts add crunch and substance. Plus, the bourbon infuses each ball with a warming finish that tantalizes the taste buds. This recipe is sure to be a hit, so let's get started!
Ingredients
- 1 cup dried cherries
Dried cherries provide the essential fruity flavor, offering a balance of sweetness and tartness. Their natural stickiness also helps bind the ingredients together. - 1/2 cup walnuts, finely chopped
Walnuts add a rich nuttiness and crunch, complementing the softness of the cherries while adding healthy fats and a satisfying mouthfeel. - 1 cup chocolate cookie crumbs
The chocolate cookie crumbs create a rich base, bringing sweetness and a chocolatey flavor that pairs perfectly with the bourbon and cherries. - 1/2 cup powdered sugar
Powdered sugar is crucial for sweetness and helps to achieve the right consistency, allowing the balls to hold together while coating the outer layer. - 1/4 cup bourbon
Bourbon not only enhances the flavor but also adds a delightful warmth that elevates the entire treat. The alcohol cooks off slightly as the balls chill, leaving behind a rich depth. - 1/2 teaspoon vanilla extract
Vanilla extract rounds out the flavors, adding a sweet, aromatic note that complements the cherries and chocolate. - Extra powdered sugar for rolling
This final touch provides a sweet finish and helps prevent the balls from sticking to one another when stored or served.
Directions & Preparation
Step 1: Start by chopping the dried cherries and walnuts.
Chopping the dried cherries ensures that they’re evenly distributed throughout the mixture, allowing each ball to have a burst of flavor. Walnuts also need to be finely chopped to avoid large chunks that could affect the texture. This initial step sets the stage for a well-integrated mixture.
Step 2: In a large mixing bowl, combine the chopped cherries, walnuts, cookie crumbs, powdered sugar, bourbon, and vanilla extract.
Mixing all the dry and wet ingredients together allows the flavors to meld and distribute evenly throughout the batter. Make sure to combine thoroughly to avoid any dry spots. You’re looking for a mixture that can hold its shape when formed into balls.
Step 3: Use your hands to form small balls of the mixture, approximately the size of a standard truffle.
Forming the mixture into balls is crucial; they should be dense and compact to hold together well. A consistent size helps with presentation and ensures that each guest gets a uniform treat. Consider using a small ice cream scoop for even portions.
Step 4: Roll each ball in powdered sugar to coat, ensuring even coverage.
Coating the balls in powdered sugar not only adds sweetness but also makes for a visually appealing presentation. This step also helps prevent them from sticking together, making them easier to serve at your party.
Step 5: Place the coated balls on a baking sheet lined with parchment paper and refrigerate for at least 2 hours before serving.
Chilling the bourbon balls is essential as it allows them to firm up, making the texture exquisite and ensuring the flavors deepen as they meld together. The waiting time builds anticipation and ensures a delightful serve.
Step 6: Serve chilled or at room temperature for the best flavor experience.
Serving the cherry bourbon balls chilled will enhance their refreshing quality. As they warm up slightly at room temperature, the bourbon flavor becomes more pronounced, making them a versatile treat that appeals to many.

The Art of Balancing Flavors
In creating the perfect cherry bourbon balls, it's essential to find the right balance of flavors. The tartness of the cherries should complement the sweetness of the chocolate crumbs and the richness of the bourbon. Adjusting the quantities of each ingredient allows you to customize your treats—consider reducing sugar slightly if you prefer a less sweet flavor profile.
Texture Matters: Finding the Right Consistency
The texture of cherry bourbon balls can be a game changer in their appeal. Ensure that the mixture is not too wet or too dry; a fine balance is key. The nuts add crunch, while the cherries offer chewiness, and chocolate crumbs provide a satisfying foundation. If the mixture feels too loose, additional cookie crumbs can help firm it up.
Party Presentation: Making the Treats Stand Out
Presentation can elevate even the simplest treats into something special. Consider using decorative cupcake liners or a beautiful platter to display your cherry bourbon balls. You can also add a dusting of cocoa powder or colored sugar for visual appeal, giving your dessert table an elegant, inviting look that will tantalize guests.
FAQs
What can I do if my mixture is too dry?
If your mixture seems too dry and is not holding together well, gradually add a little more bourbon or a touch of melted chocolate to restore moisture.
How can I tell if my bourbon balls are well mixed?
A well-mixed batter will hold together when pressed and should have a uniform color, without dry patches of cookie crumbs or nuts visible.
Is it possible to use fresh cherries instead of dried?
While fresh cherries are juicier, they will alter the texture. If using fresh, be sure to chop and dry them well, and reduce the other liquids in the mixture.
What should I do if I want thicker bourbon balls?
If you prefer a thicker texture, you can add more cookie crumbs or nuts to the mixture. This will give more body to each ball.
What if my balls are too sticky to roll?
If your mixture is too sticky, chill it in the refrigerator for about 30 minutes before rolling. This will firm up the dough and make it easier to shape.
Can I flavor these with another type of liqueur?
Absolutely! You can experiment with other liqueurs such as rum or whiskey. Just keep in mind that the flavor profile will change.
Conclusion
Cherry bourbon balls are not just a treat; they’re a way to bring joy and flavor to any gathering. Simple enough for home cooks yet impressive enough for entertaining, they embody the spirit of festive celebrations. Allowing homemade treats to take center stage is a great way to show care and creativity.
With their rich flavors and delightful textures, it’s hard to eat just one. Whether enjoyed with family or shared with friends at a party, these boozy sweets are sure to spark smiles and compliments. So gather your ingredients, give this recipe a try, and watch as your cherry bourbon balls become a new favorite!
Recipe Card

Roasted Honey Beets and Carrots for Every Meal
Ingredients
- 4 medium beets peeled and cubed
- 4 large carrots peeled and sliced
- 2 tablespoons olive oil
- 3 tablespoons honey
- Salt and pepper to taste
- 1 teaspoon fresh thyme chopped (optional)
Instructions
- Preheat your oven to 400°F (200°C).
- Prepare the vegetables by peeling and cutting the beets and carrots.
- In a large mixing bowl, combine beets, carrots, olive oil, honey, salt, and pepper. Toss until well coated.
- Spread the vegetables in a single layer on a baking sheet.
- Roast in the oven for about 30-35 minutes, stirring halfway through.
- Check for doneness; they should be tender when pierced with a fork.
- If desired, sprinkle with fresh thyme just before serving.
Notes
Additional serving suggestions: pair with a crisp salad, garlic bread, or roasted seasonal vegetables for balance.
For make-ahead, prep components separately and assemble just before heating to preserve texture.
Taste and adjust with acid (lemon/vinegar) and salt right at the end to wake up flavors.


