Introduction
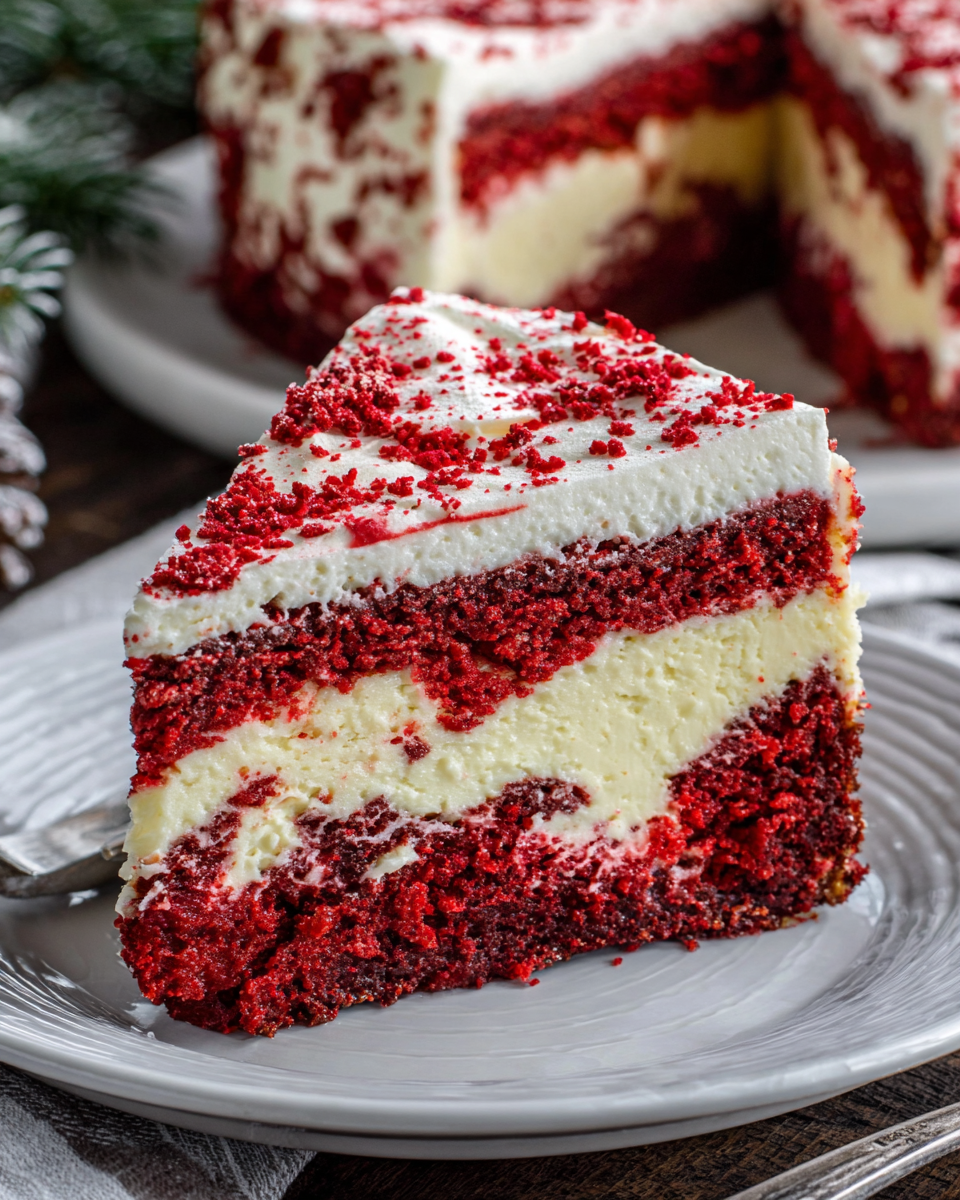
There's something truly enchanting about the holiday season, and this Christmas Red Velvet Cheesecake encapsulates that magic perfectly. With its deep crimson hue and rich, velvety texture, this dessert stands out as a showstopper on any festive table. It combines the classic flavors of red velvet cake with the creamy indulgence of cheesecake, making each slice a decadent experience.
Imagine serving this stunning dessert at gatherings with friends and family, eliciting gasps of delight with its vibrant color and luscious cream cheese frosting. Not only is it visually appealing, but it also delivers a delightful blend of flavors that will leave everyone coming back for more. Whether you're an experienced baker or just starting out in the kitchen, this recipe offers a structured path to creating a holiday favorite.
Ingredients
- 2 cups all-purpose flour
A key component of the cake part, all-purpose flour gives structure and stability to the cheesecake. It also helps achieve the desired texture that complements the creaminess. - 1 ½ cups granulated sugar
This sweetener not only provides the necessary sweetness but also contributes to the texture of the cheesecake, helping to create that creamy, luxurious mouthfeel. - 1 cup unsweetened cocoa powder
Cocoa powder adds a rich chocolate flavor, balancing the sweetness and providing depth to the red velvet flavor profile. - 1 teaspoon baking soda
This leavening agent helps the cake rise, creating a light and airy texture that contrasts beautifully with the dense cheesecake layer. - 1 teaspoon salt
Salt enhances the overall flavor of the cheesecake, bringing out the natural sweetness and richness of the other ingredients. - 1 cup vegetable oil
Oil retains moisture in the cake, resulting in a tender crumb that is essential for a rich dessert like red velvet cheesecake. - 1 cup buttermilk
Buttermilk adds a tangy flavor, balancing the sweetness while also reacting with the baking soda to create a tender texture. - 2 large eggs
Eggs contribute moisture and rich flavor, while also ensuring the cake sets properly during baking. - 2 tablespoons red food coloring
This ingredient gives the cheesecake its signature red color, making it visually striking for holiday celebrations. - 1 teaspoon vanilla extract
Vanilla adds depth and complexity, enhancing the overall flavor profile of the cheesecake. - 16 oz cream cheese
Cream cheese is the base for the cheesecake layer, providing a rich and tangy flavor that balances the sweetness of the cake. - 1 cup powdered sugar
Powdered sugar sweetens the cheesecake layer and helps create a smooth texture when combined with cream cheese. - 1 teaspoon lemon juice
Lemon juice adds a subtle tang and brightness to the cheesecake, enhancing its flavor and cutting through the sweetness. - 1 cup heavy whipping cream
Whipping cream contributes to the light and fluffy texture of the cheesecake layer, creating a luxurious mouthfeel. - 1 teaspoon cornstarch
Cornstarch helps stabilize the cheesecake mixture, preventing it from cracking during baking.
Directions & Preparation
Step 1: Preheat your oven to 350°F (175°C).
Preheating the oven is crucial for ensuring that your cheesecake bakes evenly. A hot oven allows the cake to rise appropriately, resulting in a fluffy texture while setting up properly to avoid being undercooked.
Step 2: In a large bowl, sift together the flour, cocoa powder, baking soda, and salt.
Sifting the dry ingredients not only removes any lumps but also incorporates air, which can lighten the mixture. This step is essential for achieving a smooth and tender red velvet cake base.
Step 3: In a separate bowl, mix the vegetable oil, sugar, buttermilk, eggs, vanilla, and food coloring until well combined.
Properly mixing these wet ingredients ensures that the sugar dissolves completely, which helps with even baking. The oil and buttermilk create the desired moist texture, while the food coloring imparts the signature hue.
Step 4: Combine the wet ingredients with the dry ingredients and mix until just combined.
Mixing just until combined helps to avoid overmixing, which could lead to a tougher cake. This technique is key to maintaining a tender crumb.
Step 5: Grease and line a 9-inch springform pan, then pour in the red velvet batter and smooth the top.
Properly preparing the pan is essential for easy removal of the cheesecake after baking. The smooth top ensures even baking and helps avoid cracks in the surface.
Step 6: Bake the red velvet cake layer for 25-30 minutes, or until a toothpick comes out clean.
Baking until just set allows for the perfect texture. Checking with a toothpick helps you gauge doneness without overbaking, which can result in a dry cake.
Step 7: Let the cake cool completely in the pan while you prepare the cheesecake layer.
Cooling the cake allows it to firm up and makes it easier to layer with the cheesecake. This patience pays off in terms of texture and structural integrity.
Step 8: In a mixing bowl, beat the cream cheese until smooth, then gradually add in the powdered sugar and lemon juice.
Starting with smooth cream cheese prevents lumps in the cheesecake mixture. Gradually adding the sugar helps incorporate it without overwhelming the mixture, ensuring a creamy consistency.
Step 9: In a separate bowl, whip the heavy cream until stiff peaks form, then fold it into the cream cheese mixture.
Whipping the cream to stiff peaks incorporates air, giving the cheesecake a light and airy texture. Folding gently ensures that you maintain the volume, resulting in a luxurious layer.
Step 10: Spread the cheesecake layer over the cooled red velvet cake, smoothing it evenly on top.
An even layer of cheesecake not only looks appealing but ensures that each slice has the perfect balance of cake and cheesecake. This step is essential for presentation.
Step 11: Refrigerate the assembled cake for at least 4 hours or overnight, allowing it to set firmly.
Chilling is vital for developing flavor and achieving the right texture. A well-set cheesecake provides clean slices and an enjoyable eating experience.
Step 12: Once set, carefully remove the cheesecake from the springform pan and garnish as desired.
Removing the cheesecake gently ensures that you don't damage its structure. Garnishing adds a festive touch and enhances the overall presentation.

The Magic of Red Velvet
Red velvet is a flavor often associated with celebrations, and this cheesecake takes it to new heights. Its unique combination of cocoa and vibrant red color creates a striking dessert that’s not just visually stunning but also rich in flavor. Incorporating this classic flavor into a cheesecake transforms it into a creamy delight that adds a special touch to any holiday feast.
Cream Cheese Bliss
The silky smooth texture of cream cheese is what makes this cheesecake component so indulgent. By blending it with powdered sugar and whipped cream, you achieve a light yet rich consistency that pairs perfectly with the red velvet layer. The slight tanginess of the cream cheese balances the sweetness of the sugar, creating a harmonious flavor that's simply irresistible.
Festive Garnishes that Delight
Presentation is key in making this cheesecake irresistibly festive. Consider garnishing with fresh berries, chocolate shavings, or a drizzle of white chocolate for an extra touch of elegance. Not only do these garnishes add visual appeal, but they can also enhance the overall flavor, making every bite an experience to remember.
FAQs
What if my cheesecake layer seems too soft after baking?
If the cheesecake layer is too soft, it may need more chilling time. Ensure it is properly cooled in the fridge for several hours or overnight to firm up.
Can I use a different type of cream cheese for this recipe?
You can use a low-fat or whipped cream cheese, but the texture may be slightly different. Full-fat cream cheese provides a richer, creamier result.
What should I do if my red velvet batter is too thick?
If the batter appears too thick, you can try adding a little extra buttermilk, one tablespoon at a time, until the desired consistency is achieved.
How can I ensure my cheesecake doesn't crack on top?
To prevent cracking, avoid overmixing your batter and ensure you bake at the appropriate temperature. Cooling the cake gradually is also essential.
Is there a way to make this cheesecake more chocolatey?
You can incorporate chocolate chips or a chocolate ganache layer on top to enhance the chocolate flavor without overwhelming the red velvet.
What if my red velvet layer is dry after baking?
If the red velvet cake is dry, it may have been overbaked. Always monitor your oven and test with a toothpick early to ensure optimal baking time.
Conclusion
Creating a Christmas Red Velvet Cheesecake is a delightful way to celebrate the season. This breathtaking dessert not only tastes divine but also brings a festive spirit to your holiday gatherings. Its combination of rich flavors and stunning presentation makes it a memorable centerpiece on any dessert table.
As you slice into this creamy, red-tinged indulgence, you'll find that it's not just about satisfying your sweet tooth but also about sharing moments around the table with loved ones. So gather your ingredients, put on your apron, and let the celebrations begin with this festive dessert!
Recipe Card

Roasted Honey Beets and Carrots for Every Meal
Ingredients
- 4 medium beets peeled and cubed
- 4 large carrots peeled and sliced
- 2 tablespoons olive oil
- 3 tablespoons honey
- Salt and pepper to taste
- 1 teaspoon fresh thyme chopped (optional)
Instructions
- Preheat your oven to 400°F (200°C).
- Prepare the vegetables by peeling and cutting the beets and carrots.
- In a large mixing bowl, combine beets, carrots, olive oil, honey, salt, and pepper. Toss until well coated.
- Spread the vegetables in a single layer on a baking sheet.
- Roast in the oven for about 30-35 minutes, stirring halfway through.
- Check for doneness; they should be tender when pierced with a fork.
- If desired, sprinkle with fresh thyme just before serving.
Notes
Additional serving suggestions: pair with a crisp salad, garlic bread, or roasted seasonal vegetables for balance.
For make-ahead, prep components separately and assemble just before heating to preserve texture.
Taste and adjust with acid (lemon/vinegar) and salt right at the end to wake up flavors.


