Introduction
For many, the combination of chocolate and cream is synonymous with the joy of indulgence. When that combination is made into a cake, it transforms into an irresistible centerpiece for any gathering. The Oreo Cake stands out with its rich flavors and delightful textures, making it the perfect treat for both kids and adults alike.
This cake is a chocolate lover's dream, delivering layers of moist chocolate cake balanced perfectly with creamy Oreo frosting. It's an easy recipe that impresses with its presentation and flavor, ensuring that it will be the star of your dessert table. Get ready to delight your friends and family with a cake that highlights the beloved Oreo cookie.
Ingredients
- 1 ¾ cups all-purpose flour
Flour provides the structure of the cake. The gluten developed from the flour gives the cake its form and helps create that wonderful rise that'll give you a fluffy texture. - 2 cups granulated sugar
Sugar sweetens the cake, but it also influences texture. It helps to create a moist crumb by retaining moisture during baking. - ¾ cup unsweetened cocoa powder
Cocoa powder adds the rich chocolate flavor that defines this cake. It also contributes to the cake's dark color, enhancing its decadent appearance. - 1 ½ teaspoons baking powder
Baking powder is a leavening agent that helps the cake rise. It creates air bubbles in the batter, making the cake light and fluffy. - 1 ½ teaspoons baking soda
Similar to baking powder, baking soda helps in the rising process but requires an acid to activate it. It contributes to the overall lift and texture of the cake. - 1 teaspoon salt
Salt enhances the flavor of the chocolate and balances the sweetness. It is essential for a well-rounded taste in baked goods. - 2 large eggs
Eggs act as a binding agent, helping to hold the cake together. They also provide moisture and richness, adding to the cake's overall texture. - 1 cup whole milk
Milk adds moisture, richness, and flavor to the cake. It helps to create a tender crumb, making every bite delightful. - ½ cup vegetable oil
Oil keeps the cake moist and contributes to a rich texture. It also aids in producing a tender crumb compared to using butter. - 2 teaspoons pure vanilla extract
Vanilla adds a wonderful depth of flavor. It enhances the sweetness and should not be overlooked in any cake recipe. - 1 ½ cups crushed Oreo cookies
These Oreo pieces not only add flavor but also a unique texture to the cake. They serve as both decoration and a delicious mix-in. - 2 cups heavy whipping cream
Heavy cream is essential for making the frosting fluffy and light. It whips well, providing that dreamy texture that's perfect for a layered cake. - 1 cup powdered sugar
Powdered sugar sweetens the frosting without the graininess of granulated sugar. It dissolves easily in cream, ensuring a smooth, velvety finish. - 1 cup crushed Oreo cookies (for decoration)
These will serve as a final touch, giving visual appeal and an extra crunch to enhance the cake's taste.
Directions & Preparation
Step 1: Preheat your oven to 350°F (175°C) and prepare cake pans.
Preheating the oven ensures that the oven reaches the desired temperature before the batter goes in, which is important for even baking. Greasing the pans prevents the cake from sticking, ensuring easy release once baked.
Step 2: In a large mixing bowl, combine the flour, sugar, cocoa powder, baking powder, baking soda, and salt.
Mixing the dry ingredients first helps ensure that the leavening agents are evenly distributed, which is crucial for the cake to rise uniformly. This step sets the foundation for achieving that perfect fluffy texture.
Step 3: Add the eggs, milk, oil, and vanilla to the dry ingredients and blend until combined.
Combining wet and dry ingredients effectively brings all elements together. It's crucial not to overmix at this stage, as that can develop gluten and result in a dense cake. Aim for a smooth batter.
Step 4: Fold in the crushed Oreo cookies gently to your batter.
This step is where the Oreo flavor penetrates the cake. Folding ensures that the pieces are evenly distributed without breaking them into dust. These cookie bits will add delightful texture and taste.
Step 5: Divide the batter evenly between your prepared cake pans and bake for 30–35 minutes.
Evenly dividing the batter helps the cakes to bake at the same rate, preventing uneven baking. The cakes should spring back when touched lightly, indicating they are done.
Step 6: Once baked, allow the cakes to cool in the pans for 10 minutes before transferring to a wire rack.
Cooling in the pan allows the cakes to set and makes removal easier. Transferring to a wire rack helps them cool completely, which is important for frosting later.
Step 7: While the cakes cool, prepare the frosting by whipping the heavy cream with powdered sugar until stiff peaks form.
Whipping the cream to stiff peaks is essential for a stable frosting. This rigidity will hold the layers together without collapsing, creating a beautiful finish.
Step 8: Once cakes are completely cool, place one layer on a serving platter and spread a layer of frosting on top.
Creating layers not only enhances flavor but also adds an impressive visual aspect. It's essential that the cakes are fully cooled to prevent the frosting from melting.
Step 9: Stack the second layer on top and frost the top and sides of the entire cake.
Frosting the sides and top evenly coats the cake and ensures that every slice is delectable. You can use a spatula to create a smooth finish or a swirl effect for added flair.
Step 10: Top the entire cake with crushed Oreo cookies for decoration and serve.
The crushed Oreos act as a finishing touch, immediately signaling to guests that this is a special treat. It enhances presentation and adds an extra layer of flavor.

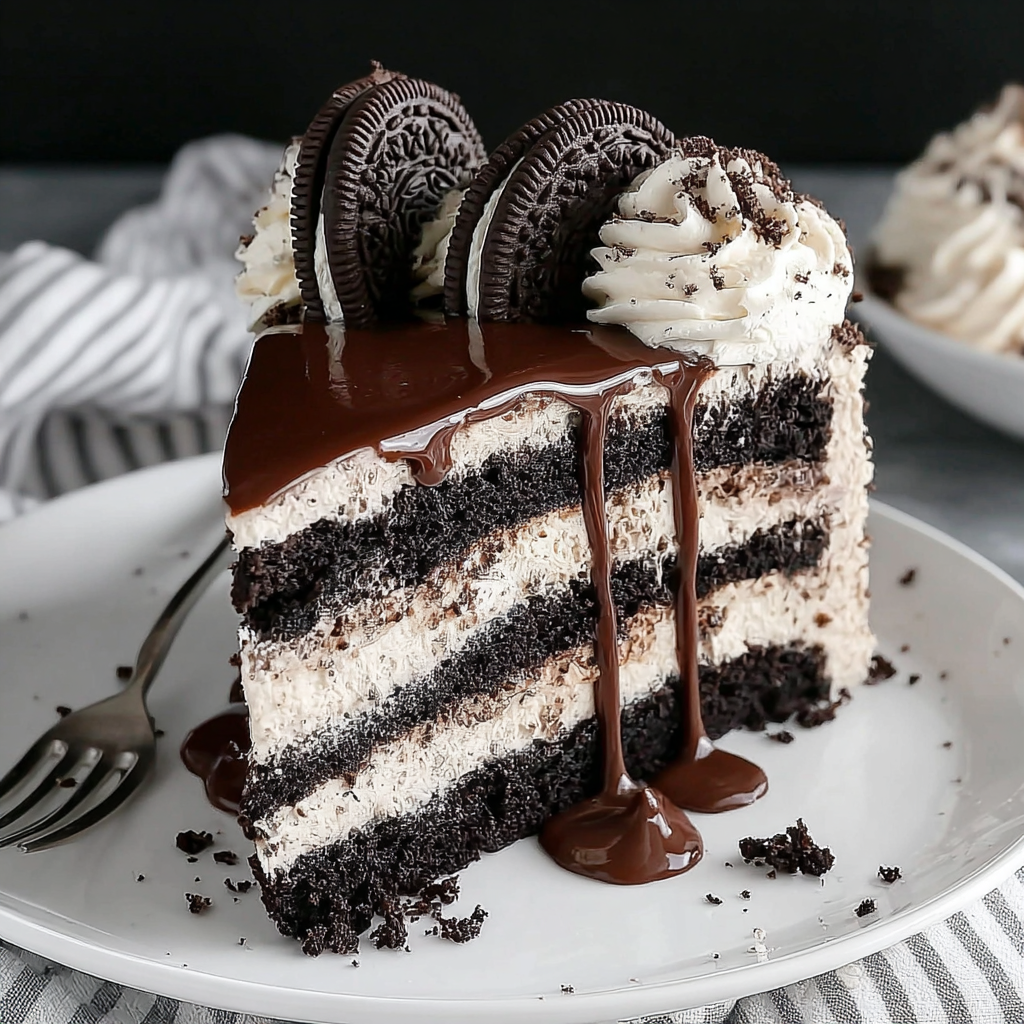
Cakey Delight with a Crunch
The combination of soft, moist cake and crunchy Oreo pieces creates a delightful contrast in texture. Each slice reveals not only the richness of chocolate but also the satisfying crunch of Oreos, making every bite a culinary experience. The textural interplay makes this cake a family favorite, suitable for birthdays and celebrations alike.
Frosting Perfection
The whipped cream frosting is a game changer. It’s light and airy, complementing the dense chocolate cake without overwhelming it. This fluffy texture balances the richness, creating a harmonious flavor profile. Enhancing the frosting with crushed Oreos adds another dimension, making it irresistible to dessert lovers.
Customizing Your Oreo Cake
Feel free to personalize your Oreo cake! Add layers of different flavored frostings or incorporate seasonal fruits. The base recipe is versatile; you can even swap in flavored creams or additional cookie crumbles. This adaptability means you can craft a cake that shines at any occasion, whether it's a holiday gathering or a family barbecue.
FAQs
What should I do if my cake isn't rising?
Ensure that your baking powder and baking soda are fresh, as expired leavening agents won’t provide the necessary lift.
How can I prevent my cake from sticking to the pans?
Make sure to thoroughly grease your pans with butter or cooking spray and consider using parchment paper for an extra guarantee.
What if my frosting is too thick?
If your frosting is too thick, you can add a little bit of milk, one tablespoon at a time, to achieve the desired consistency.
Can I make this cake with gluten-free flour?
Yes, you can substitute the all-purpose flour with a gluten-free blend, but ensure it contains a binding agent for the best results.
How do I make sure my cake layers are even?
Using a kitchen scale to measure the batter can help in achieving equally sized layers for a more professional look and even baking.
What can I do if my frosting is too sweet?
To balance the sweetness, add a pinch of salt or some additional whipped cream to cut through the sugariness without compromising texture.
How do I create cleaner edges on my cake while frosting?
Using a bench scraper or a straight metal spatula can help achieve sharp edges, creating a more polished finish on your frosting.
Conclusion
Incorporating the beloved flavors of Oreos into a cake has never been easier or more rewarding. This simple yet elegant recipe is bound to impress your guests and elevate any celebration.
With its rich, chocolatey layers and creamy frosting, the Oreo Cake not only satisfies sweet cravings but also creates cherished memories of sharing food with loved ones. Enjoy baking it, and don't forget to savor each decadent bite!
Recipe Card
A Decadent Delight: Oreo Cake for Any Occasion
Ingredients
- 1 ¾ cups all-purpose flour
- 2 cups granulated sugar
- ¾ cup unsweetened cocoa powder
- 1 ½ teaspoons baking powder
- 1 ½ teaspoons baking soda
- 1 teaspoon salt
- 2 large eggs
- 1 cup whole milk
- ½ cup vegetable oil
- 2 teaspoons pure vanilla extract
- 1 ½ cups crushed Oreo cookies
- 2 cups heavy whipping cream
- 1 cup powdered sugar
- 1 cup crushed Oreo cookies for decoration
Instructions
- Preheat your oven to 350°F (175°C) and prepare cake pans.
- In a large mixing bowl, combine the flour, sugar, cocoa powder, baking powder, baking soda, and salt.
- Add the eggs, milk, oil, and vanilla to the dry ingredients and blend until combined.
- Fold in the crushed Oreo cookies gently to your batter.
- Divide the batter evenly between your prepared cake pans and bake for 30–35 minutes.
- Once baked, allow the cakes to cool in the pans for 10 minutes before transferring to a wire rack.
- While the cakes cool, prepare the frosting by whipping the heavy cream with powdered sugar until stiff peaks form.
- Once cakes are completely cool, place one layer on a serving platter and spread a layer of frosting on top.
- Stack the second layer on top and frost the top and sides of the entire cake.
- Top the entire cake with crushed Oreo cookies for decoration and serve.
Notes
Additional serving suggestions: pair with a crisp salad, garlic bread, or roasted seasonal vegetables for balance.
For make-ahead, prep components separately and assemble just before heating to preserve texture.
Taste and adjust with acid (lemon/vinegar) and salt right at the end to wake up flavors.


