Introduction
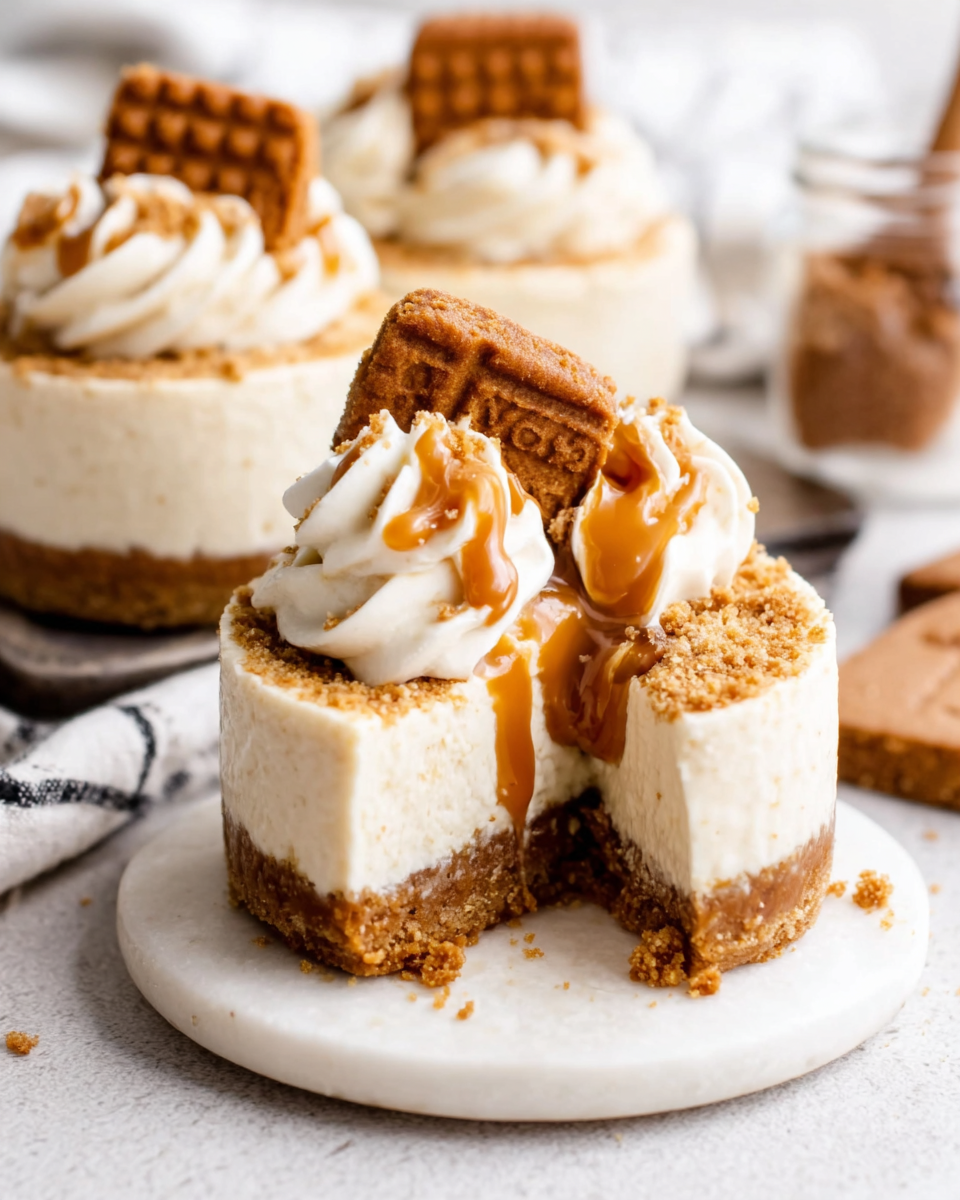
If you're in the mood for a dessert that's as easy to make as it is delightful to eat, look no further than mini no-bake Biscoff cheesecakes. These charming little treats capture the unique flavor of Biscoff cookies, featuring a creamy cheesecake filling that’s both rich and light.
Not only do these mini cheesecakes require no baking, but they're also perfect for any occasion, from casual family gatherings to elegant dinner parties. The combination of the crunchy cookie base and the silky cheesecake is simply irresistible, making each bite a celebration of flavor.
Ingredients
- 12 Biscoff cookies
These cookies create the perfect, rich base for the cheesecake, bringing their unique caramel flavor to the forefront. - 4 tablespoons unsalted butter, melted
Butter binds the cookie crumbs together to form a sturdy crust while adding a rich flavor that complements the Biscoff cookies. - 8 oz cream cheese, softened
Cream cheese is the star of the filling, giving the cheesecake its creamy texture and slightly tangy taste that balances the sweetness of the cookies. - 1/2 cup powdered sugar
Powdered sugar adds sweetness to the cheesecake filling, ensuring it isn’t overly rich while also helping to create a smoother texture. - 1 teaspoon vanilla extract
This adds depth to the flavor profile, enhancing the overall taste of the cheesecake while complementing the caramel notes of the Biscoff. - 1/2 cup heavy whipping cream
Whipping cream is essential for achieving a light, airy texture in the cheesecake, making it melt-in-your-mouth delicious. - 1/4 cup Biscoff spread
This spread not only intensifies the Biscoff flavor within the cheesecake but also serves as a delicious drizzle on top for added indulgence.
Directions & Preparation
Step 1: Prepare the crust.
Start by crushing the Biscoff cookies into fine crumbs, either in a food processor or by placing them in a zip-top bag and crushing them with a rolling pin. This step is crucial for a uniform crust that holds together when assembled. Melt the butter and combine it with the cookie crumbs for the perfect binding action, which will help the crust maintain its shape when set.
Step 2: Press the crust mixture into mini cheesecake pans.
Take the cookie and butter mixture and evenly press it into the bottoms of the mini cheesecake pans. Ensure it’s compact and smooth so it forms a solid base. This well-formed crust will provide a delightful crunch and rich flavor that will support the creamy filling, making each bite balanced and satisfying.
Step 3: Make the cheesecake filling.
In a mixing bowl, beat the softened cream cheese until smooth and creamy, then gradually add the powdered sugar and vanilla extract. This is the heart of the cheesecake, where texture and flavor are established. Mixing until well combined ensures there are no lumps, leading to the ultimate velvety cheesecake experience in every bite.
Step 4: Add the whipped cream and Biscoff spread.
In a separate bowl, whip the heavy cream until stiff peaks form, then fold it gently into the cream cheese mixture along with Biscoff spread. This folding technique preserves the airiness of the whipped cream, critical for achieving a light texture that contrasts beautifully with the dense crust below.
Step 5: Spoon the filling into the crusts.
Carefully spoon the cheesecake filling into each well of the crust, spreading it evenly. This step allows for the creamy, luscious filling to sit perfectly atop the crunchy base. Be gentle to keep the layers distinct and presentable, aiming for a smooth top to your mini cheesecakes.
Step 6: Refrigerate to set.
Place the assembled cheesecakes in the refrigerator for at least 4 hours, or overnight if possible. Chilling the cheesecakes allows them to firm up, ensuring the flavors meld together while setting the filling to a sliceable consistency. This waiting period is essential for developing the best taste.
Step 7: Serve with Biscoff spread.
Once set, take the cheesecakes out of the fridge and drizzle more Biscoff spread over the top. This finishing touch not only enhances the appearance but amplifies the Biscoff flavor, inviting everyone to dig in. Serve immediately, and watch these delicious mini desserts disappear!

Why No-Bake Cheesecakes Are the Perfect Dessert
One of the greatest joys of no-bake cheesecakes is their simplicity. With no oven required, you can whip up these delightful treats in just a short amount of time, making them perfect for spontaneous gatherings. Additionally, they remain rich and creamy while being remarkably light, allowing for guilt-free indulgence—a key factor in their rising popularity.
Elevating Your Mini Cheesecakes with Toppings
While the Biscoff spread is a lovely finishing touch, there are numerous ways to elevate these mini treats even further. Consider adding whipped cream, chocolate shavings, or even crushed Biscoff cookies on top for extra flavor and texture. Sprigs of mint can also bring a refreshing contrast, ensuring each cheesecake not only tastes great but also looks stunning on your table.
Pairing Suggestions for Mini Biscoff Cheesecakes
When it comes to serving these mini Biscoff cheesecakes, the right beverage can elevate the experience. A silky smooth cappuccino or a sweet dessert wine complements the caramel notes beautifully. You could also consider pairing them with a fresh fruit salad, as the acidity from fruits like raspberries or strawberries balances the richness of the cheesecake, making for a delightful contrast.
FAQs
What can I do if my cheesecake filling is too thick?
If your cheesecake filling appears too thick, you can gently fold in a small amount of milk or additional heavy cream until you reach your desired consistency without over-mixing.
Can I double or halve the ingredients for more or fewer servings?
Yes, this recipe can be easily scaled by doubling or halving the ingredients. Just ensure you adjust the cooking time for any refrigeration needed based on the size of your cheesecake.
What should I do if my crust crumbles when I cut it?
If the crust crumbles, it may be due to insufficient butter. Ensure the crumbs are properly combined with enough melted butter for a sturdy base that holds together.
How can I make my cheesecake less sweet?
To reduce the sweetness of your cheesecake, simply decrease the amount of powdered sugar in the filling. Taste as you go to find the perfect balance that suits your preference.
What if I want to incorporate other flavors into the filling?
Feel free to customize the flavor of your filling by adding different extracts, such as almond or hazelnut, or incorporating fruit purees to create a unique twist.
Can I use a different type of cookie for the crust?
Absolutely! While Biscoff adds a distinctive flavor, you can substitute it with other cookies like Oreos or graham crackers, adjusting the butter as needed to maintain the right texture.
Conclusion
Mini no-bake Biscoff cheesecakes are not only a treat for the eyes but are a dessert for your taste buds as well. With their creamy texture and deliciously crumbly crust, they are bound to impress any guest, no matter the occasion.
The simplicity of the recipe invites countless variations, so feel free to experiment and make it your own. Whether enjoying them as a mid-week treat or presenting them at a festive gathering, these cheesecakes are sure to be a crowd-pleaser.
Recipe Card

Satisfy Your Cravings with High Protein Low Carb Cake
Ingredients
- 1 cup almond flour
- 1/2 cup unsweetened cocoa powder
- 1 cup protein powder whey or plant-based
- 4 large eggs
- 1/4 cup unsweetened applesauce
- 1/2 cup erythritol or preferred sweetener
- 1 tsp baking powder
- 1/2 cup unsweetened almond milk
- 1 tsp vanilla extract
Instructions
- Preheat the oven to 350°F (175°C) and prepare your baking pan.
- In a large mixing bowl, combine the almond flour, cocoa powder, protein powder, erythritol, and baking powder.
- In another bowl, whisk the eggs, almond milk, applesauce, and vanilla extract together until well combined.
- Pour the wet mixture into the dry ingredients and mix until just combined.
- Pour the batter into the prepared baking pan and smooth the top with a spatula.
- Bake in the preheated oven for 25-30 minutes, or until a toothpick inserted in the center comes out clean.
- Once baked, allow the cake to cool in the pan for 10 minutes before transferring it to a wire rack to cool completely.
- Once cooled, slice and serve the cake as desired.
Notes
Additional serving suggestions: pair with a crisp salad, garlic bread, or roasted seasonal vegetables for balance.
For make-ahead, prep components separately and assemble just before heating to preserve texture.
Taste and adjust with acid (lemon/vinegar) and salt right at the end to wake up flavors.


