Introduction
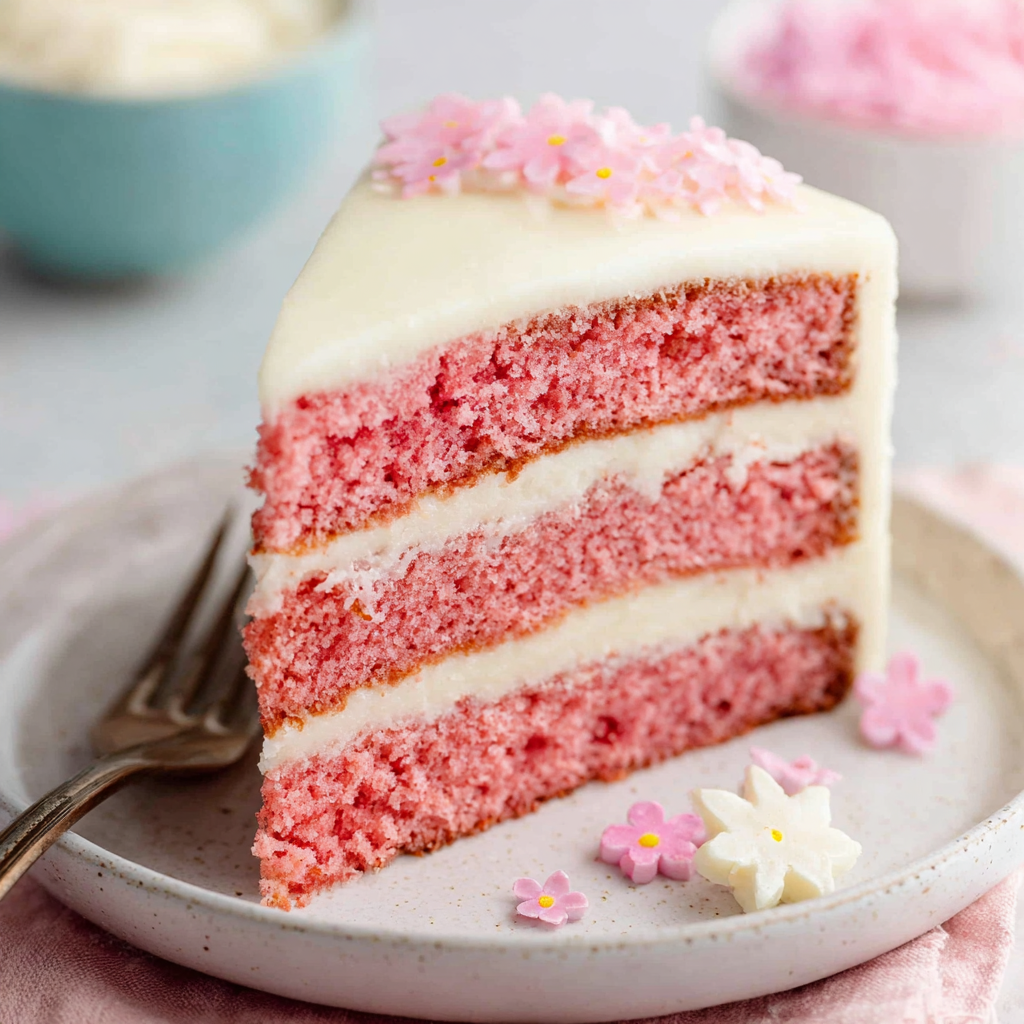
The Pink Velvet Cake is a nod to traditional red velvet, yet stands out with its soft pastel hue and delicate flavor. This cake isn't just visually appealing; it's moist and has a tender crumb that melts in your mouth, making it a delightful choice for gatherings.
Perfect for birthdays, baby showers, or even a cozy afternoon treat, this cake embodies a charming aesthetic paired with a unique taste profile. Its subtle vanilla undertones combined with a hint of cocoa balance beautifully with a rich cream cheese frosting that accentuates the overall flavor.
Ingredients
- 2 ½ cups all-purpose flour
All-purpose flour provides the structure to the cake, ensuring it holds together. It contributes to the cake's soft yet sturdy crumb, allowing it to rise beautifully in the oven. - 1 ½ cups granulated sugar
Sugar not only sweetens the cake but also helps create a tender texture. It plays a pivotal role in the creaming process, incorporating air into the batter which contributes to the cake's lift. - 1 cup unsalted butter, softened
Butter adds richness and moisture to the cake, enhancing its flavor. The creaming process with sugar helps aerate the butter, leading to a lighter cake. Unsalted butter allows control over the overall saltiness of the batter. - 1 cup buttermilk
Buttermilk adds acidity which reacts with baking soda, helping the cake rise and contributing a pleasant tang. Its moisture content ensures the cake remains soft and fluffy. - 3 large eggs
Eggs act as a binding agent and provide moisture. They also aid in the leavening process, while the yolks introduce richness and the whites create a light texture. - 1 tablespoon cocoa powder
While minimal, cocoa powder has a crucial role in adding depth to the flavor without overpowering the cake. It aids in the cake's distinctive color, turning the traditional red velvet into a soft pink. - 1 teaspoon baking powder
Baking powder is the primary leavening agent, helping the cake to rise effectively. It activates in the moist batter and produces carbon dioxide, which contributes to the cake's fluffy texture. - 1 teaspoon baking soda
Baking soda works with the acid from buttermilk to create lift in the batter. It also neutralizes the acidity, balancing the cake’s flavor. - 1 teaspoon vanilla extract
Vanilla extract enhances the cake's sweet flavor, making it rounder and more aromatic. It’s an essential component in baking that rounds off the overall taste profile. - Pink food coloring (as needed)
Food coloring is key to achieving the signature pink hue of this cake. Adjust the amount based on your desired intensity to make your cake visually stunning.
Directions & Preparation
Step 1: Preheat your oven to 350°F (175°C) and grease your cake pans.
Preheating the oven is crucial for an even bake, helping the cake rise properly from the start. Greasing the pans ensures the cakes will release easily once baked, preventing any sticking that can mar the delicate texture.
Step 2: In a large mixing bowl, cream together the softened butter and granulated sugar until light and fluffy.
Creaming the butter and sugar incorporates air, creating a light mixture that results in a fluffy cake. Aim for a texture that resembles whipped cream, and this could take about 3-5 minutes. This step is fundamental for achieving the desired crumb density.
Step 3: Add the eggs one at a time, mixing well after each addition.
Incorporating eggs gradually ensures they emulsify fully into the batter, helping to maintain a stable mixture. This also ensures even distribution of moisture and structure, vital for the cake's final texture.
Step 4: Mix in the vanilla extract and cocoa powder until combined.
This is the stage where flavors begin to build. Mixing the cocoa powder at this point aids in ensuring it evenly disperses throughout the batter, preventing any clumping that could affect the cake's texture.
Step 5: In a separate bowl, whisk together the flour, baking powder, baking soda, and salt.
Whisking these dry ingredients together helps to evenly distribute the leavening agents and salt. This step minimizes the potential for uneven rising and enhances the overall consistency of the batter.
Step 6: Alternately add the dry ingredients and buttermilk to the butter mixture, starting and ending with the flour.
This method helps to maintain a perfect balance of moisture and structure in the batter. Overmixing at this stage can lead to a tougher cake, so mix just until combined for a tender crumb.
Step 7: Add pink food coloring until the desired shade is achieved.
Adding food coloring at this stage allows you to control the intensity of the hue. Start with a small amount and mix until you reach a shade that reflects the playful nature of the Pink Velvet Cake.
Step 8: Divide the batter evenly between the prepared pans.
Even distribution ensures that the cakes bake uniformly, preventing one cake from rising higher than the other. Use a scale if you're particularly particular about achieving equal weights.
Step 9: Bake for 25-30 minutes, or until a toothpick inserted in the center comes out clean.
Baking times can vary based on your oven and pan size. The toothpick test is a reliable method — look for moist crumbs rather than wet batter to ensure your cakes are perfectly baked.
Step 10: Allow the cakes to cool in the pans for 10 minutes before transferring them to a wire rack.
Cooling briefly in the pan helps set the structure but prevents them from becoming soggy. Transferring to a wire rack helps maintain airflow, allowing the cakes to cool evenly without becoming moist on the bottom.
Step 11: Once cooled completely, frost with your favorite cream cheese frosting.
Frosting a completely cooled cake prevents the frosting from melting and sliding off. Cream cheese frosting complements the flavor of Pink Velvet Cake perfectly, adding a tangy richness that balances the sweetness.

The Accent of Color in Baking
The vibrant pink hue of the Pink Velvet Cake not only enhances its visual appeal but also speaks to the joyous occasions it often graces. Color plays a significant role in our perception of flavor. This cake's rosy shade can elevate a simple gathering into a celebratory feast, creating an inviting atmosphere that entices guests to indulge.
Frosting Variations to Elevate Your Cake
While cream cheese frosting is a classic pairing, feel free to experiment with various frostings to suit your taste preferences. From a silky buttercream to a rich chocolate ganache, the choice of frosting can profoundly impact the cake's flavor and presentation. Think of adding fruity elements, like raspberry puree, to the frosting for an exciting twist and an extra layer of sophistication.
Creating an Unforgettable Occasion
The Pink Velvet Cake is not just a treat; it's a centerpiece that can transform a humble occasion into a memorable one. Think of garnishing it with fresh flowers or edible glitter to add a touch of glamour. The experience of crafting and enjoying this cake can create lasting memories, providing a sweet narrative that will be recounted long after the last slice has been devoured.
FAQs
My batter is too thick. What should I do?
If your batter feels too thick, consider adding an extra splash of buttermilk. This can help loosen the mixture without compromising the overall texture. Always add gradually to achieve your desired consistency.
Can I use cake flour instead of all-purpose flour?
Yes, you can substitute cake flour for all-purpose flour in this recipe for an even lighter crumb. However, reduce the amount slightly, as cake flour has a higher starch content, which can affect the cake’s structure.
What if my cakes domed in the center?
If your cakes domed, it may be due to baking at too high a temperature or overmixing the batter. To correct this, ensure you follow your oven's calibration and mix just until combined next time.
How can I add flavor without changing the color?
To add flavor without altering color, consider incorporating extracts like almond or lemon. These can provide a refreshing twist while maintaining the signature pink hue.
Why is my cake too dense?
A dense cake can result from overmixing the batter or using too much flour. Ensure you measure ingredients accurately and mix gently to prevent the compounds from developing too much gluten.
How can I adjust the sweetness of the cake?
If you prefer a less sweet cake, you can reduce the amount of sugar slightly. However, be cautious as sugar contributes to the overall moisture and structure of the cake.
Is there a substitute for buttermilk?
If you don't have buttermilk, you can use regular milk with a splash of vinegar or lemon juice. Let it sit for about 10 minutes to curdle slightly before incorporating it into the batter.
Conclusion
Baking a Pink Velvet Cake is a rewarding endeavor that beautifully combines aesthetics and flavor. Each slice serves as a reminder of the joy that baking can bring, both in the process and in sharing with loved ones.
With its unique charm, this cake will undoubtedly become a favorite in your baking repertoire. So gather your ingredients, embrace the creativity, and let your oven work its magic.
Recipe Card

Delightful Pink Velvet Cake for Every Occasion
Ingredients
- 2 ½ cups all-purpose flour
- 1 ½ cups granulated sugar
- 1 cup unsalted butter softened
- 1 cup buttermilk
- 3 large eggs
- 1 tablespoon cocoa powder
- 1 teaspoon baking powder
- 1 teaspoon baking soda
- 1 teaspoon vanilla extract
- Pink food coloring as needed
Instructions
- Preheat your oven to 350°F (175°C) and grease your cake pans.
- In a large mixing bowl, cream together the softened butter and granulated sugar until light and fluffy.
- Add the eggs one at a time, mixing well after each addition.
- Mix in the vanilla extract and cocoa powder until combined.
- In a separate bowl, whisk together the flour, baking powder, baking soda, and salt.
- Alternately add the dry ingredients and buttermilk to the butter mixture, starting and ending with the flour.
- Add pink food coloring until the desired shade is achieved.
- Divide the batter evenly between the prepared pans.
- Bake for 25-30 minutes, or until a toothpick inserted in the center comes out clean.
- Allow the cakes to cool in the pans for 10 minutes before transferring them to a wire rack.
- Once cooled completely, frost with your favorite cream cheese frosting.
Notes
Additional serving suggestions: pair with a crisp salad, garlic bread, or roasted seasonal vegetables for balance.
For make-ahead, prep components separately and assemble just before heating to preserve texture.
Taste and adjust with acid (lemon/vinegar) and salt right at the end to wake up flavors.


